
Imagine hitting the open road with everything you need packed right in the back of your truck. Your home on wheels stands ready for adventure at a moment’s notice. Building a truck bed camper lets you do exactly that, combining the freedom of camping with the comfort of a custom-built shelter.
The process of how to build a truck bed camper involves careful planning, smart material choices, and hands-on construction. Unlike buying a pre-made shell or slide-in unit, building your own gives you full control over size, layout, insulation, and features like windows and storage. With basic tools and some carpentry skills, you can create a lightweight, weatherproof camper that fits your truck bed like a glove.
Measure Your Truck Bed Accurately
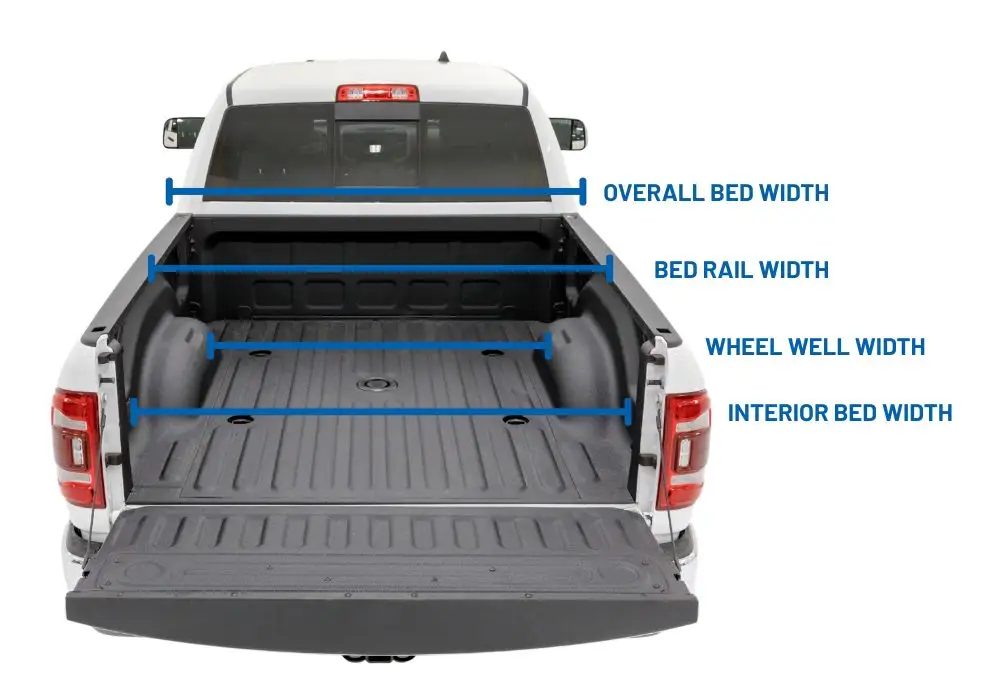
Before cutting any wood, you need precise measurements of your truck bed. Even small discrepancies can prevent the camper from fitting properly or cause stress on the structure during travel.
Confirm Your Truck Model and Bed Size
Check your truck’s manufacturer specifications to confirm bed length. Common sizes are 5.5, 6.5, and 8 feet. Measure from the inside of the tailgate to the base of the cab, then note the width at both the top rail level and the bottom floor level. Many truck beds taper slightly, so measure at multiple points to get accurate dimensions.
Wheel well placement also matters. These protrusions reduce usable space and must be factored into your floor plan. Sketch a basic outline of the bed with all dimensions labeled for reference during construction.
Account for Fender Wells and Tailgate Clearance
Fender wells limit interior width and affect floor and wall placement. Measure their height and width so your design accommodates them properly. Leave at least half an inch of clearance around all sides to allow for easy removal and thermal expansion.
Your camper should not interfere with opening or closing the tailgate. If you plan to remove the camper frequently, ensure it doesn’t require disassembly each time you need access to the bed.
Design Your Camper Layout
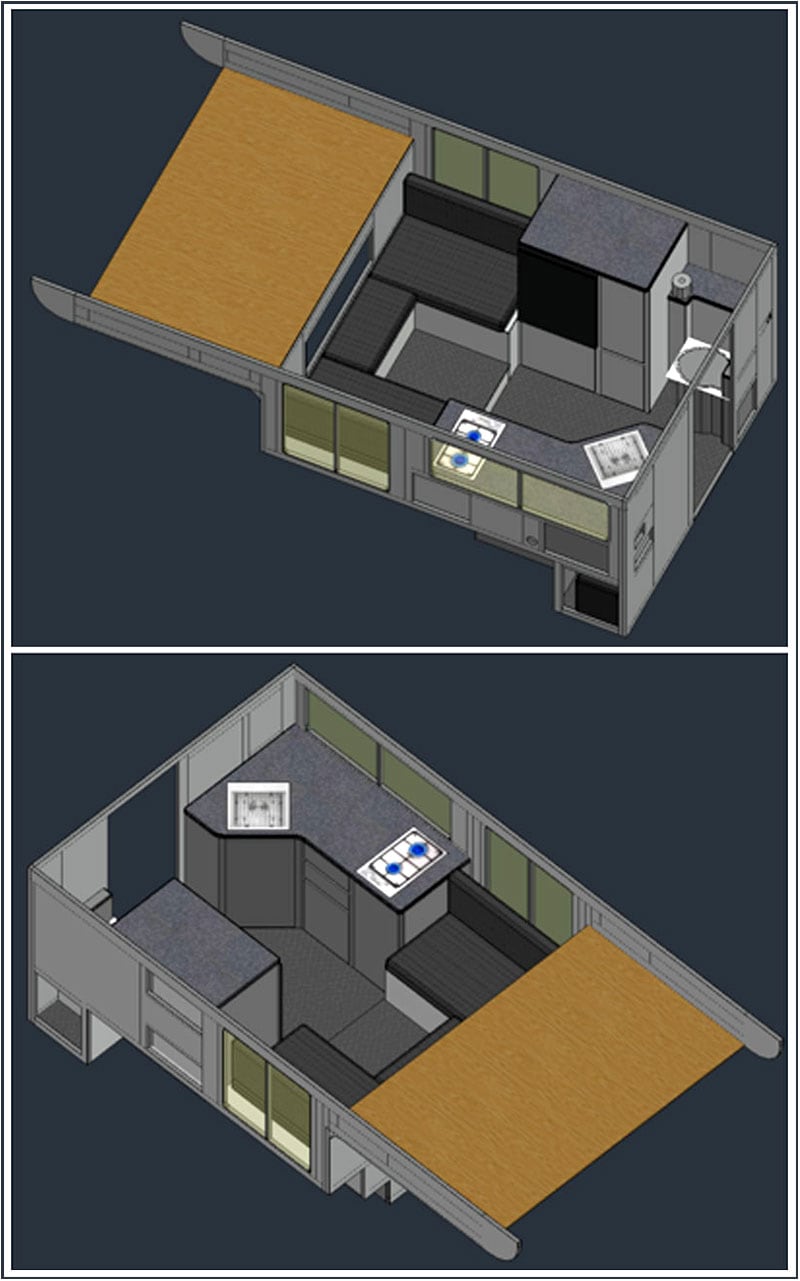
A smart layout maximizes space, comfort, and functionality without overloading your truck.
Choose a Floor Plan That Fits
Most truck bed campers use a rectangular box design, but you can customize based on your needs. Common configurations include full-length sleepers, compact shells with fold-out sections, or hybrid setups with storage below and sleeping above.
Prioritize sleeping space. If two people will use it, aim for at least 28 inches of width per person. Include space for ventilation, lighting, and small storage compartments. Keep the center of gravity low to maintain vehicle stability on the road.
Plan Entry Points and Ventilation
Will you access the camper from the cab, the tailgate, or both? Some designs include a removable rear panel or a hinged hatch for tailgate entry. Others integrate with a camper shell and use side doors instead.
Ventilation is critical for comfort. Plan for at least one window or vent to prevent condensation and improve air quality. Passive roof vents or small opening windows work well in most climates.
Build the Floor Frame
The floor is the foundation of your camper and must support weight while staying lightweight.
Use Lightweight but Strong Materials
Construct the floor frame from 1×2 or 1×3 cedar or pine boards spaced 16 inches apart. Cedar resists rot and is lighter than pressure-treated lumber. For added strength, use marine-grade plywood between half and three-quarter inch thick as the subfloor.
Secure the frame to the truck bed using L-brackets and rubber washers. This prevents metal-on-metal contact and reduces vibration noise while driving.
Insulate the Floor for Comfort
Glue rigid foam insulation one inch thick to the underside of the plywood before attaching it to the frame. This helps regulate temperature and reduces noise from the road below.
Seal all seams with aluminum tape or caulk to prevent air and moisture infiltration. Avoid fiberglass insulation in the floor because it can absorb moisture and lose effectiveness over time.
Construct the Walls and Roof

The walls and roof form the shell of your camper and protect you from the elements.
Frame with Lightweight Wood
Use 1×2 or 1×3 lumber to build wall frames, keeping studs 16 inches apart. Cut openings for windows and doors, reinforcing edges with doubled studs. Pre-build sections on the ground for easier assembly before standing them up.
For the roof, use a flat or slightly sloped design to shed water. Frame it with the same material as the walls and cover with plywood for a solid base.
Cover with Weather-Resistant Panels
Exterior surfaces should be waterproof and durable. Your main options include:
- Marine-grade plywood with exterior paint or sealant
- Aluminum sheets that are lightweight and dent-resistant
- Fiberglass-reinforced panels that are strong but heavier
Attach panels with stainless steel screws and seal all joints with silicone caulk. Overlap seams downward so water runs off rather than seeping inside.
Install Windows and Vents

Natural light and airflow make a big difference in comfort during your trips.
Choose Compact, Secure Windows
Slide or hinged acrylic windows are ideal because they are lightweight, shatter-resistant, and affordable. Install them with butyl tape and screws, then seal the exterior with clear silicone for a weatherproof fit.
Position one window on each side for cross-ventilation. Add a small roof vent near the top to let hot air escape during warm weather.
Prevent Condensation Buildup
Even with good ventilation, condensation can form inside the camper. Line interior walls with closed-cell foam insulation or use a moisture barrier like reflective bubble wrap before adding wall coverings.
Wipe down surfaces regularly and crack a window when sleeping to reduce humidity levels overnight.
Finish the Interior
A well-finished interior turns a basic shell into a cozy living space.
Add Insulation and Wall Coverings
After sealing the exterior, insulate interior walls with rigid foam or spray foam. Then apply wall coverings such as thin plywood with stain or paint, vinyl paneling, or canvas over foam padding.
Use adhesive and trim screws to secure materials neatly without damaging the underlying frame.
Include Essential Features
Mount LED strip lights under the roof edge for ambient lighting. Add a small USB charging port powered by a portable battery or your truck’s electrical system.
Install removable storage bins or fold-down shelves for versatility. A cushioned mattress made from closed-cell foam or a custom-cut RV mattress completes the sleeping area.
Secure and Test the Camper
Safety comes first, so your camper must stay put during driving.
Fasten to the Truck Bed
Use removable bolts or clamps that anchor into the truck bed’s stake pockets or rail system. Avoid permanent modifications unless you plan to keep the camper long-term.
Ensure all connections are tight but allow for slight movement to prevent stress cracks in the frame.
Test for Stability and Leaks
Take a short drive over bumpy roads to check for rattles or shifting. Inspect all seams and joints afterward for signs of wear or water intrusion.
Simulate rain with a garden hose to test waterproofing. Pay close attention to window seals, roof edges, and floor connections during this test.
Maintain Your DIY Camper
Regular upkeep extends the life of your build and keeps it road-ready.
Check Seals and Fasteners
Inspect silicone seals and screws every few months, especially after long trips. Reapply caulk where needed to maintain weather resistance against rain and dust.
Tighten any loose brackets or clamps before each use to prevent shifting during travel.
Store Properly Off-Season
If removing the camper for winter, store it indoors or cover it completely. Elevate it off the ground to prevent moisture absorption and pest entry underneath.
Clean the interior and leave it ventilated to prevent mold and mildew from forming.
Frequently Asked Questions About Truck Bed Campers
What is the cheapest way to build a truck bed camper?
Using lightweight pine or cedar framing with marine-grade plywood keeps material costs low. Skip expensive features like fiberglass panels and use aluminum sheeting or painted plywood instead. You can build a basic functional camper for several hundred dollars in materials.
How long does it take to build a truck bed camper?
Most DIY builders complete a basic truck bed camper in one to two weekends. More complex builds with custom interiors, electrical systems, and insulation can take several weeks of part-time work.
Do I need a permit to build a truck bed camper?
In most areas, you do not need a permit to build a non-motorized camper for personal use. However, check local regulations if your build includes electrical wiring or plumbing installations.
How much weight can a truck bed camper be?
Keep the total weight under 500 pounds for a standard half-ton truck to avoid overloading. Lightweight materials like cedar framing and thin plywood help you stay within safe limits while maintaining comfort and durability.
Can I remove my truck bed camper easily?
Yes, if you use clamps or removable bolts instead of permanent fasteners. A well-designed camper can be removed by two people in under an hour with basic hand tools.
Key Takeaways for Your Truck Bed Camper Build
Building a truck bed camper rewards you with a custom mobile shelter that fits your exact needs. Focus on accurate measurements, lightweight materials, and thorough sealing to create a durable, weatherproof structure. Prioritize insulation and ventilation for comfort in all seasons, and always test your build before heading out on long trips.
Your next step is gathering your measurements and sketching a layout that matches your truck bed. Once you have a clear plan, source your materials and start with the floor frame. With patience and attention to detail, your DIY truck bed camper will open up countless adventures on the open road.


