
If you want to protect your truck bed cargo, improve fuel efficiency, and give your pickup a sleek, finished appearance, the BakFlip G2 tonneau cover delivers on all fronts. This hard-folding cover uses a clamp-on installation system that requires no drilling and provides excellent weather resistance and security. This guide walks you through exactly how to install a BakFlip G2 tonneau cover, from preparing your truck bed to making final adjustments, so you can complete the job confidently in under an hour.
You will learn which tools you need, how to position and secure each component, and troubleshooting tips for common installation issues. Whether you drive a Ford F-150, Chevrolet Silverado, Ram, or Toyota Tacoma, these step-by-step instructions ensure a proper fit.
Prepare Your Truck Bed for Installation
Before handling any cover components, your truck bed must be clean and ready. Remove any existing tonneau covers, drop-in bed liners, or accessories that might interfere with the installation. Inspect both bed rails carefully for dents, debris, or corrosion along the top edge where the rail seals will sit, as even minor imperfections can prevent proper sealing.
Clean the entire top surface of both bed rails using isopropyl alcohol and a clean shop towel. Wipe each rail twice to remove wax, oil, silicone residue, or overspray from spray-in liners. Let the surface dry completely before proceeding. A clean rail ensures maximum grip for the clamps and prevents long-term shifting.
Confirm your truck’s make, model, year, and bed length match the cover specifications by checking the part number on the box. For best results, install the cover in temperatures between 50°F and 80°F, as cold temperatures make rubber seals stiff and heat can accelerate adhesive curing.
Tools You Need for Installation
Gather these tools before starting your installation:
- 9/16″ socket wrench or ratchet for clamp tightening
- 10mm, 13mm, and 15mm sockets depending on your truck model
- 6-inch extension bar for reaching rear clamps
- Phillips-head screwdriver (#2) for prop rods and clips
- Tape measure for verifying alignment
- Isopropyl alcohol wipes for cleaning sealing surfaces
- Scissors for trimming bulkhead seal if needed
Optional but helpful items include work gloves, a helper for lifting the cover, masking tape for marking rail positions, and silicone spray for post-installation seal conditioning.
Install the Bulkhead Seal
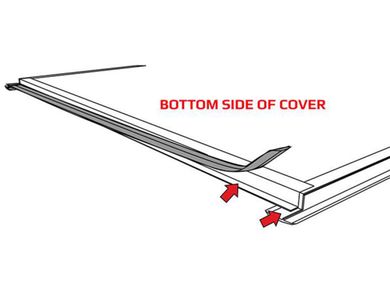
Determine whether your truck requires the bulkhead seal. Vehicles with bed rail caps or spray-in bed liners create a gap between the bed rail and the bulkhead wall behind the cab, which can cause wind noise and water intrusion if left unsealed. Trucks with drop-in bed liners that sit flush with the bulkhead typically do not need this seal.
To install the bulkhead seal, start at one end near the bulkhead and peel back 3-4 inches of the adhesive backing from the tape-backed foam or rubber strip. Press the seal firmly onto the vertical face of the bed rail cap, ensuring it contacts the bulkhead when the cover is closed. Work in 6-inch sections, smoothing carefully to avoid wrinkles or air bubbles. Trim excess material with scissors once both ends are complete, then press along the entire length with firm hand pressure for full adhesion.
Clean the application area with isopropyl alcohol before attaching the seal to maximize bonding strength and prevent peeling over time.
Position and Secure the Side Rails
Place the left and right side rails onto the bed rails with the top rubber seal sitting on top of the bed rail cap, not underneath. The mounting clamps should face toward the cab to ensure proper tension and alignment. Align the front edge of each rail approximately 1-2 inches from the bulkhead as specified in the manufacturer instructions.
Use a tape measure to verify equal distance from the bulkhead to the front of both rails. Even a 1/4-inch difference can cause panel binding or latch issues. Ensure the rails are parallel and centered side-to-side by measuring from the truck’s frame or stake pockets. Misaligned rails lead to uneven cover gaps and poor sealing.
Use masking tape to mark the ideal rail position before tightening the clamps. This helps maintain alignment during adjustments.
Install the Mounting Clamps

The BakFlip G2 uses pre-installed clamps with no drilling required. Follow this tightening sequence:
- Start with the center clamp and hand-tighten just enough to hold the rail in place.
- Install the front clamp by sliding it fully forward until it touches the bulkhead, then hand-tighten.
- Install the rear clamp approximately 8 inches from the tailgate or as far back as possible depending on your model.
Do not fully tighten at this stage, as this allows for fine-tuning after the cover is seated. For trucks with spray-in bed liners, insert the included spacer shims between the rail and bed rail where liner thickness is present. A 1/8″ shim handles standard coatings while 1/4″ may be needed for thicker liners.
Over-tightening can crack plastic bed rail caps or strip threads. Use a 9/16″ socket and apply hand-tight plus 1/4 turn. Re-check clamp tightness after 24 hours and again after one week, especially with spray-in liners that may compress slightly over time.
Attach the Cover to the Rails
With a helper, lift the folded BakFlip G2 cover and place it onto the installed rails. Ensure the front header seal overlaps the bulkhead seal you installed earlier. Center the cover so there is equal overhang on both sides, using your tape measure to confirm this.
Press down firmly on all four corners to seat the cover into the rail channels. You should hear a distinct click or feel solid engagement indicating the cover is seated correctly. The cover should sit securely without wobbling.
A small 1/8-inch gap between the cover panels and bed rails is normal and allows room for smooth folding and thermal expansion.
Some models require assembling the header panel. Slightly unfold the front panel, pull out the header panel, and insert the clip receiver with the open end facing the strap. Push threaded studs through the panel holes to create inserts, then secure with screws. Tighten snugly but avoid forcing the screws to prevent stripping aluminum.
Secure with Thumb Screws and Star Knobs
Use the elevator bolt system to lock the cover to the rails. Insert the elevator bolt through the cover and into the aluminum tab on the passenger-side rail. Underneath, stack in order: rubber washer, flat steel washer, lock washer, and star knob (with one rubber washer pre-installed on its shank). Repeat this process on the driver’s side.
Do not fully tighten at this stage, as this allows minor side-to-side adjustments to perfect alignment before final tightening.
Align and Adjust the Cover
Before final tightening, verify fit and function across all areas. Close the tailgate and confirm it latches cleanly without hitting the cover. If contact occurs, shift the entire cover forward slightly by loosening the clamps and repositioning.
Fold each panel back one at a time and check that motion is smooth with no binding. Open and close each latch and listen for a clear click indicating full engagement.
Check windshield clearance by folding the cover forward. Ensure there is no contact between the cover and windshield. If contact occurs, install the bump stops included in your kit.
Perform final tightening only after all adjustments are complete.
Install Bump Stops
Bump stops prevent the cover from touching the windshield when folded open. Gently rock the cover forward to locate the contact point on the truck frame, typically in the center near the third brake light. Clean the area with isopropyl alcohol.
Peel the backing off the 3M-backed bump stop and press firmly onto the top edge of the frame. Install three stops total: one centered and two placed approximately 2-3 inches to each side. Hold pressure for 30 seconds to ensure strong adhesion.
Avoid placing bump stops too close to the rails, as they may interfere with folding operation.
Install Drain Tubes
Drain tubes route water from the rail channels down and away from the truck frame, preventing rust and pooling. Locate the pre-drilled hole at the rear end of each rail and push the rubber drain tube into the hole from the inside.
Route the tube downward through the bed liner kick-out area, tie-down area, or factory hole. Trim excess length if the tube extends too far below the frame. Ensure tubes are not kinked or pinched, as water must flow freely.
On trucks without factory openings or where the spray-in liner covers the hole, use the rail hole as a template and carefully drill through the liner before inserting the tube. Loosen tube clamps slightly after routing, then re-snug to prevent vibration loosening.
Test the drainage by spraying water into the rail channels and verifying it exits cleanly through the tubes.
Attach Prop Rods
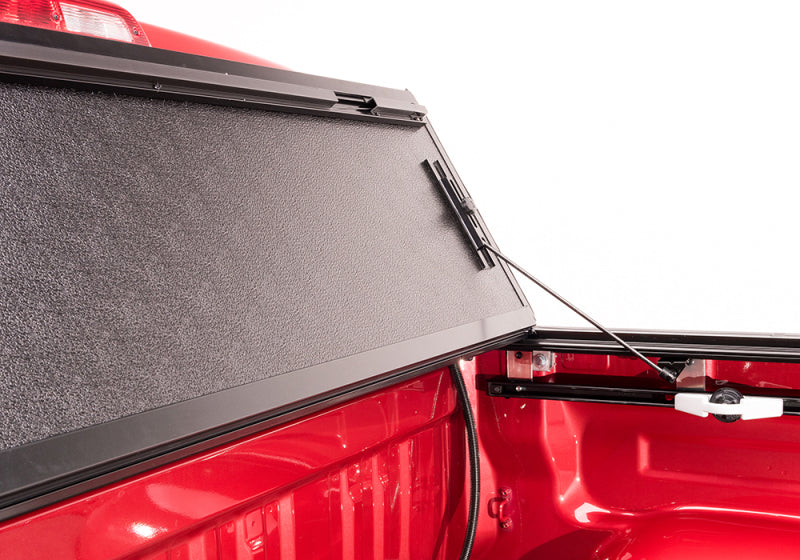
Prop rods hold the cover open when folded forward. Snap the ball-stud bracket into the rail extension facing upward, then attach the hook bracket directly beneath it. Clip the spring-loaded prop rod onto the ball stud, which should lock with a solid click. Store unused rods in the built-in rail holders.
Test the operation by folding the cover forward. The rods should extend automatically and hold the cover securely open without sagging. When closing, the rods should retract smoothly. If rods fail to lock or retract poorly, check bracket alignment and re-seat if needed.
Install the Tailgate Seal
The tailgate seal ensures a watertight rear closure. Clean the rear panel edge of the cover with alcohol, then peel the backing and press the seal firmly along the full width. The seal should hang slightly below the edge to contact the tailgate when closed.
Close the tailgate and inspect for even compression across the entire width. If gaps appear, reposition the seal while the adhesive is still fresh. If the seal doesn’t touch the tailgate, consider shifting both rails 1/4 inch rearward and retesting.
Final Fit and Operation Check
Before declaring the installation complete, perform these verification steps:
- Inspect seal compression at front, sides, and rear with no visible gaps
- Test latch function by opening and closing each panel with clear click engagement
- Verify tailgate clearance by raising and lowering 3-5 times with no interference
- Check fold operation for smooth hinge movement without binding or creaking
- Test water drainage by simulating rain and confirming clean tube exit
- Re-tighten all clamps in sequence (front, center, rear)
Take a short test drive to check for vibration, noise, or shifting. Operate the cover 10-20 times in the first week to break in hinges and latches.
Truck-Specific Installation Tips
Ford F-150 and F-250 models with tailgate steps require checking that the tailgate seal doesn’t interfere with step deployment. BoxLink systems may need spacers at specific clamp locations. Factory tie-downs remain fully accessible.
Chevrolet Silverado and GMC Sierra models with MultiPro tailgates work with all configurations. Center channel rails may need removal before installation.
Ram 1500, 2500, and 3500 models with RamBox require the narrow-bed G2 variant. Standard width covers will not fit RamBox equipped trucks.
Toyota Tacoma models with 5-foot beds require precise rail measurement due to shorter bed length. Double-check centering to prevent panel binding.
Toyota Tundra models with the deck rail system allow the BAKFlip clamps to fit around factory rails without removal.
Nissan Titan and Frontier models with Utili-Track systems have clamps that fit between track sections without removal needed.
Fix Common Installation Problems
Panels not sitting flush usually stems from uneven clamp tension or misaligned rails. Measure rail height at multiple points and adjust clamps until level.
Latches not engaging indicate misaligned latch mechanisms. Loosen latch screws, reposition slightly, and retighten.
Water leaks at seams result from poor seal compression or clogged drain tubes. Adjust rails inward slightly, clean tubes, and allow 1-2 weeks for seals to compress.
Tailgate seal gaps occur when rails are positioned too far forward. Shift both rails 1/4 inch rearward and retest.
Cover folding difficulty happens when panels are pinched by tight rails. Loosen clamps slightly while maintaining 1/8-inch clearance.
Prop rods failing to lock stem from improper bracket seating or weak springs. Re-seat the rod and verify bracket snap. Contact support if the spring is faulty.
Remove and Reinstall the Cover
Quick removal takes under 5 minutes. Open the tailgate, fold the cover forward, unclip the prop rods, loosen the clamps (do not remove), and lift the cover straight up and out. Store with a helper’s assistance.
For reinstallation, position the cover over the rails, lower into channels while pressing corners to seat, retighten clamps in sequence, reconnect prop rods, and test operation.
Store the cover indoors when possible, keep it folded rather than laying flat long-term, cover with a blanket to prevent scratches, and clean before reinstalling.
Break-In Period Expectations
Expect minor changes during the first 2-4 weeks of use. During the first week, slight stiffness in hinges and latches is normal. Operate the cover 10-20 times to break in the mechanisms.
After rain, minor seepage is possible but improves as seals compress. Temperature swings cause creaking or popping from thermal expansion, which is normal.
Re-check clamp tightness after 24 hours and one week, especially on spray-in liner installations. Avoid high-pressure car wash sprays on seams for the first two weeks to allow adhesives to cure.
Maintain Your BakFlip G2
Monthly maintenance includes operating all panels to check smoothness, inspecting seals for cracks or tears, and testing latch engagement.
Every three months, wash with car soap and water, apply silicone spray to seals, and clear drain tubes with a pipe cleaner or air.
Every six months, re-tighten mounting clamps, lubricate hinges and latches with dry silicone lubricant (avoid oil-based products), and check tailgate seal adhesion.
Annually, perform a full component inspection and consider seal replacement in harsh climates. Average seal lifespan is 5-7 years. Test prop rod spring tension and replace if weak.
Register Your Warranty
The BakFlip G2 includes a 3-year limited warranty covering material and workmanship defects, panel warping, delamination, hinge failure, and hardware deterioration under normal use. The warranty does not cover accidental damage, misuse, improper installation, normal wear items, or modifications.
Register within 30 days of purchase by visiting the BAK Industries warranty page. Enter your serial number, purchase date, truck details, and upload proof of purchase. Save your confirmation email.
Frequently Asked Questions About BakFlip G2 Installation
How long does it take to install a BakFlip G2?
First-time installers typically complete the installation in 25-45 minutes. Experienced DIYers may finish in under 30 minutes. The process is straightforward with no drilling required on most truck models.
Do I need to drill holes to install the BakFlip G2?
No, the BakFlip G2 uses a clamp-on installation system that secures to the bed rails without drilling or permanent modifications. This makes removal and reinstallation straightforward.
Can I install a BakFlip G2 with a spray-in bed liner?
Yes, spray-in bed liners are compatible. Use the included spacer shims between the rail and bed rail where liner thickness is present. A 1/8″ shim handles standard coatings while 1/4″ may be needed for thicker liners.
Why is water leaking into my truck bed after installation?
Water leaks usually stem from poor seal compression, clogged drain tubes, or missing bulkhead seals on trucks with bed rail caps or spray-in liners. Adjust rails inward slightly, clean drain tubes, and ensure the bulkhead seal is properly installed.
How do I know if my truck needs a bulkhead seal?
Trucks with bed rail caps or spray-in bed liners require the bulkhead seal to close the gap between the bed rail and bulkhead wall. Trucks with drop-in bed liners that sit flush with the bulkhead typically do not need this seal.
Key Takeaways for Installing Your BakFlip G2
The BakFlip G2 installs quickly in 25-45 minutes using a simple clamp-on system that requires no drilling. Proper preparation of your truck bed, including cleaning bed rails and installing the bulkhead seal when needed, prevents water leaks and wind noise. Follow the recommended clamp tightening sequence and re-check tightness after 24 hours and one week.
With correct setup and routine maintenance, your BakFlip G2 delivers years of protection, security, and improved fuel efficiency. Register your warranty within 30 days to activate full coverage, and consult the included model-specific instructions for your particular truck.


