
If your truck bed sits exposed to sun, rain, and prying eyes, a fiberglass tonneau cover offers a rugged, custom-fit solution that boosts security, fuel efficiency, and curb appeal. While commercial models can cost $800 to $2,000, building your own DIY fiberglass tonneau cover is a rewarding project that delivers comparable performance at a fraction of the price. Using basic woodworking and composite techniques, you can create a durable, multi-section cover that fits your truck’s exact dimensions.
This guide walks you through every step, from measuring your bed and framing the structure to laying fiberglass, finishing, and installing hardware. The process uses common materials like ¾” plywood, epoxy resin, 1.5 oz fiberglass mat, and marine spar urethane to ensure longevity and resistance to UV and moisture.
Build the Wooden Substructure

The wooden substructure forms the foundation of your tonneau cover. This frame must precisely match your truck bed’s dimensions to ensure a snug, professional fit.
Measure Your Truck Bed Accurately
Start by measuring your truck bed’s length, width at front and rear, and rail height. A typical midsize truck like the Ford Maverick has a 62.5-inch length from cab to tailgate, with the front bed at 72 inches wide and flaring to 78 inches at the rear. These dimensions are critical for a clean look and secure mounting.
Use a tape measure and mark the centerline of the bed, then measure 34¾ inches from center on each side to establish the side profile. Draw a smooth, tapered line from front to back to match the bed’s flare. This line becomes your cutting template for the main frame.
Frame Dimensions and Material Layout
Construct the main frame from 2×4 lumber and ¾” plywood, with additional support from 1×10 and 1×4 boards. Cut two side boards to 70″ and 78″ to follow the bed’s taper. Install a 2×4 support rail ¾ inch above the bed rail on the interior side. This creates a drainage lip that directs water off the outer edge and prevents pooling in the bed.
Use pocket-hole joinery with a jig to assemble joints flush and strong. Clamp warped boards flat before drilling and screwing. Perform a dry-fit between the cab and tailgate to confirm full contact and adjust for any misalignment.
Install Hangover Supports and Drainage Lip
The ¾-inch elevation of the frame above the bed rails is not just for fit. It is a functional drainage lip that prevents water from backing into the bed during rain. Secure the 2×4 support rail with clamps first, then fasten with pre-drilled screws to avoid splitting. Tap the rail with a hammer if minor height adjustments are needed before final attachment.
Ensure the entire frame sits level and parallel to the bed rails. Once secured, this base becomes the substrate for fiberglass lamination and must remain stable and flat.
Assemble Optional Storage Boxes
Some builders integrate in-frame storage boxes for tools, chargers, or gear. These compartments add utility and help stiffen the overall build.
Cut and Fit Out-of-Square Compartments
Due to the truck bed’s flared shape, these boxes are intentionally out of square. One side might be 24 inches deep, the other 20 inches. Cut the pieces accordingly: two at 24″, two at 24¾”, and four at 25½” to account for material thickness and overlap.
Use wood glue and screws for assembly. Always pre-drill holes to prevent splitting, especially in pine or plywood edges. Assemble the boxes before mounting them inside the main frame.
Mount Boxes Inside the Frame
Position the boxes within the main structure so they fit tightly and do not shift. They should reinforce the frame, not float loosely. Secure with screws through the frame into the box sides. Once mounted, these compartments add rigidity especially useful for long-bed models.
Ensure the top edges remain flush with the main cover surface. Any protrusions will interfere with fiberglass layup and final sanding.
Prepare the Substrate for Fiberglass
Proper substrate preparation is critical to prevent delamination, which is one of the most common failure modes in DIY fiberglass builds.
Apply Oil-Based Stain (Optional)
For a richer look, apply oil-based stain to the exposed wood surfaces before sealing. This enhances grain visibility and gives the finished cover a more premium appearance. Use a brush or cloth to apply evenly, and allow at least 24 hours to dry. Ideally, allow 72 hours for full cure.
Never skip the curing time. Applying fiberglass over uncured oil-based products is a leading cause of delamination where the composite layer separates from the wood due to trapped solvents and incomplete cross-linking.
Clean with 100% Mineral Spirits
After staining and curing, clean the entire surface with 100% mineral spirits, not generic paint thinner. The latter may leave residues that interfere with adhesion. Wipe down with a lint-free cloth, wearing gloves to avoid skin contact.
This step removes surface oils and ensures the marine spar urethane bonds properly. Any contamination at this stage can lead to fisheyes, peeling, or weak spots in the final finish.
Seal with Marine Spar Urethane
Apply three coats of oil-based marine spar urethane, sanding lightly between coats with 180 to 220 grit. This product is essential. It is formulated for UV resistance and moisture protection, outperforming standard polyurethane in outdoor conditions.
Allow 24 hours between coats, but 72 hours is ideal for full cross-linking. Before fiberglassing, lightly sand the final coat with 180 grit to create a mechanical bond. Wipe clean with a dry cloth afterward.
Warning: Never apply fiberglass over uncured finishes. Delamination risk is high.
Lay Fiberglass and Cure Properly
The fiberglass layup transforms the wooden frame into a durable, weather-resistant composite shell. This step requires attention to mixing ratios and application technique.
Mix Epoxy at 4:1 Ratio
Use epoxy resin instead of polyester. Epoxy offers better adhesion, UV resistance, and durability. While the manufacturer may recommend a 5:1 resin-to-hardener ratio by volume, real-world builds show that 4:1 delivers a better balance of working time and cure strength.
Mix thoroughly in a clean container to ensure complete chemical activation. Incomplete mixing leads to soft spots or sticky areas that never harden.
Apply Resin and Roll Fiberglass Mat
Start by brushing a generous coat of epoxy onto the prepared substrate. This wet-out layer seals the surface. Lay pre-cut 1.5 oz chopped strand mat over the wet resin.
Then, dollop mixed epoxy directly onto the mat and use a resin roller, not a brush, to spread it evenly. Brushing is ineffective due to the mat’s texture and leaves air pockets. Roll firmly to eliminate air bubbles and ensure full saturation. Look for a wet, translucent finish with no dry spots or whitish areas.
Cold Cut Excess Fiberglass
After about 2 hours, when the epoxy is set but not fully cured, use a sharp utility knife to trim excess fiberglass and resin along the edges. This cold cut technique produces clean, chip-free edges without damaging the cured surface.
Cut slowly and steadily. Once trimmed, allow the piece to cure for 24 or more hours before sanding. Avoid disturbing the cover during cure, as vibration or flexing can weaken the bond.
Sand and Finish the Surface
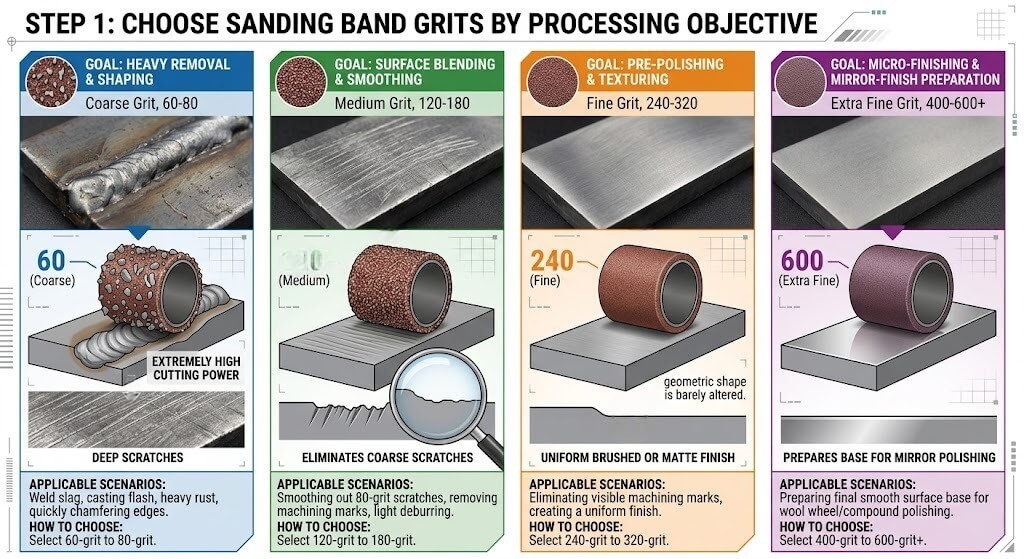
Progressive sanding creates a smooth, paint-ready surface. This phase determines the final appearance of your tonneau cover.
Progress Through Grits: 60 to 600
Begin sanding with 60-grit paper to level high spots and remove roller marks. Move to 100-grit for general smoothing, then 180, 320, and 600 for a paint-ready finish. Sand by hand or with a dual-action sander, using light pressure to avoid gouging.
Wipe the surface with a damp cloth after each grit to lift dust, then dry with a lint-free towel. Any remaining particles will show under paint.
Test Paint Compatibility First
Never assume a paint is safe for composites. Some foam-safe flat black paints have been reported to melt foam cores or degrade cured fiberglass.
Test your chosen paint on a small, inconspicuous area first. Recommended: Krylon H2O black spray paint, formulated for foam and composites with excellent durability. Alternatives include universal satin black paint and primer, but verify compatibility.
Spray Paint for Uniform Finish
Apply paint in light, even coats from 10 to 12 inches away. Allow 15 to 20 minutes between coats. Two to three coats are usually sufficient.
Avoid heavy spraying which can cause runs or orange peel. Work in a dust-free, well-ventilated area. Let the final coat dry for 24 hours before handling or installing hardware.
Install Hinges, Struts, and Seals
Hardware installation transforms your cover from a static panel into a functional, accessible system.
Mount Stainless Steel Hinges
Attach 4-inch stainless steel hinges along the front edge of each lift-up side panel. Pre-drill all holes to prevent splitting.
Use rubber gaskets under hinge screws to seal against water entry. Position hinges so the cover opens smoothly without binding.
Install Gas Struts for Hands-Free Lift
Gas struts make lifting a heavy fiberglass cover effortless. Use two Vepa 15-inch struts, each rated at 22.5 lb of force, for a total 45 lb lift capacity.
Mount the brackets at 30% of the cover width from the hinge side. For a 48″ cover, that is 14.5 inches from the back edge. Ensure 1¼ inches of clearance beyond the rail to prevent contact when closing.
Pre-drill all mounting holes. Use washers and lock nuts, not standard nuts, to prevent vibration loosening. Test the lift. With both struts, the cover should rise past midpoint and stay open.
Add Weather Stripping and Latches
Apply closed-cell foam weather stripping along contact edges to seal against rain and dust. Press firmly into place.
Install latches near the tailgate end for security. For added protection, interlock the cover with the trunk lock so it cannot be opened unless the trunk is unlocked.
Use bungee cords as a secondary hold-down when driving at highway speeds.
Reinforce and Test the Cover
Structural reinforcement ensures your cover performs reliably at highway speeds and in adverse weather conditions.
Add Aluminum Channel Support
If your bed rails do not extend to the tailgate, install aluminum channel as a support bracket. Attach it using existing truck bolts, no drilling required.
Tape the top edge with protective tape to prevent cuts. This support eliminates rear flex, especially at high speeds or in crosswinds.
Test for Wind and Highway Stability
Drive at highway speeds and through crosswinds to evaluate performance. Minor flex in the rear section is normal but should be corrected with aluminum reinforcement.
One builder logged 3,000 miles including a trip from Arkansas to Colorado with no structural issues. With proper support, the cover handles strong storms and gusts without failure.
Check Sealing and Water Resistance
While not 100% watertight, a well-built cover sheds most rain. For extra protection, lay a 5′ x 7′ tarp in the bed beneath cargo.
Inspect seams, screw holes, and joints annually. Reapply sealant if water ingress is detected.
Maintain and Upgrade as Needed
Regular maintenance extends the life of your DIY tonneau cover and keeps it performing at its best.
Inspect Hardware Yearly
Vibration loosens fasteners over time. Re-tighten screws, hinges, and strut mounts annually. Check gas struts for reduced lift. Replace if they no longer hold the cover open.
Inspect weather stripping for cracking or compression. Replace as needed to maintain a tight seal.
Clean and Wax the Surface
Wash with mild soap and water. Apply automotive wax to the painted surface twice a year to preserve gloss and UV protection.
Avoid harsh chemicals or pressure washers which can degrade the finish.
Consider Future Upgrades
Some builders plan to upgrade to commercial covers like BAKFlip, but most say they would repeat the DIY build for the cost savings and personal satisfaction.
You can always add features later, such as LED lighting, solar panels, or additional locking mechanisms.
Frequently Asked Questions About Making a Fiberglass Tonneau Cover
How long does it take to build a DIY fiberglass tonneau cover?
Most builders complete the project over two to three weekends. Frame construction takes one day, substrate preparation takes three to five days due to cure times, fiberglass layup and sanding take another two days, and final painting and hardware installation take one to two days.
What materials are needed for the wooden frame?
You will need 2×4 lumber for primary framing, ¾” plywood for the base, and 1×10 and 1×4 boards for support and trim. A typical build uses six 8-foot 2×4 boards, two sheets of ¾” plywood, and three each of 8-foot 1×10 and 1×4 boards.
Why is marine spar urethane recommended instead of regular polyurethane?
Marine spar urethane is formulated specifically for outdoor marine applications. It offers superior UV resistance and moisture protection compared to standard polyurethane. It also provides better adhesion for subsequent fiberglass layup and resists cracking and yellowing over time.
Can I use polyester resin instead of epoxy?
While polyester resin is cheaper, epoxy is strongly recommended for tonneau cover applications. Epoxy provides better adhesion to wood substrates, superior UV resistance, and greater durability. Polyester is more prone to delamination and degradation from sun exposure.
How do I prevent delamination between the fiberglass and wood?
The key is proper substrate preparation. Never apply fiberglass over uncured oil-based finishes. Allow oil-based stain and urethane to cure for at least 72 hours. Clean the surface with 100% mineral spirits before layup. Lightly sand the final urethane coat to create a mechanical bond.
What paint is safe to use on fiberglass tonneau covers?
Krylon H2O black spray paint is recommended because it is specifically formulated for foam and composite surfaces. Test any paint on a small inconspicuous area first. Some foam-safe paints have been reported to damage underlying materials.
Key Takeaways for Building Your Fiberglass Tonneau Cover
A DIY fiberglass tonneau cover is more than a functional upgrade. It is a testament to craftsmanship that delivers custom fit, durability, and personal satisfaction at a fraction of commercial prices. The key is patience. Invest time in substrate preparation, cure times, and progressive finishing for professional results.
The most critical success factors include using marine spar urethane for UV and moisture protection, mixing epoxy at a 4:1 ratio for optimal working time and cure strength, and ensuring all oil-based finishes fully cure for 72 hours before fiberglass application. Pre-drill all holes to prevent wood splitting, and use lock nuts on gas struts to prevent vibration loosening.
With proper materials and techniques, your homemade cover can last 5 to 10 years while providing excellent weather resistance, partial cargo access, and a custom appearance that complements your truck. Do it right, and you will enjoy the pride of saying, “I built that.”


