

Picture this: rain is pouring sideways on your weekend camping trip, and every tool in your truck bed is soaked. A properly installed canopy prevents this exact frustration, turning your open bed into a secure, weatherproof storage space or mobile shelter. Getting it right means choosing the correct installation method, using the right hardware, and sealing everything properly. This guide covers every method, tool, and expert tip you need to install your truck bed canopy with confidence and keep it performing for years.
Choose the Right Installation Method for Your Needs
Your installation method determines everything from security and weather protection to how easily you can remove the canopy later. Two main approaches dominate, with a third option offering flexibility for specific use cases.
Clamp vs. Bolt-Down: Core Differences
Clamp systems use topper clamps that grip your bed rails without drilling. You can install them in minutes with no tools, making them perfect for seasonal use or frequent bed access. Aluminum toppers handle clamp pressure especially well.
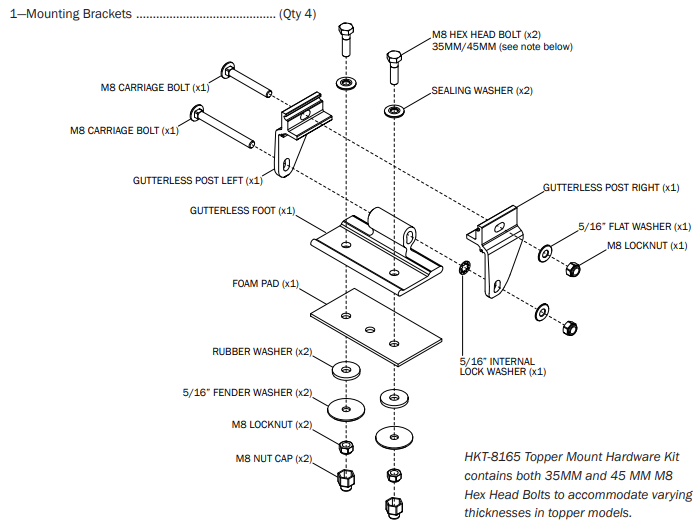
The bolt-down method uses angle iron brackets secured through the bed rail and canopy with bolts and fender washers. This creates a permanent, high-strength bond that resists vibration and heavy loads. It’s the preferred option for fiberglass canopies, which are vulnerable to clamp damage.
When Slide-In Wheeled Canopies Make Sense
For maximum versatility, a slide-in one-piece canopy on wheels rolls in and out of your bed on integrated wheels. This design suits users who frequently switch between open-bed work and enclosed cargo or camping setups. The trade-offs include maintaining a weather-tight seal with frequent removal and ensuring wheels don’t interfere with tailgate operation.
Seal Your Canopy for Long-Lasting Weather Protection
A perfect seal is non-negotiable. Even the strongest attachment fails if water seeps in, causing rust, mold, and damage to both your cargo and your truck bed.
Apply High-Quality Foam Weatherstripping Tape
Use outdoor-rated foam weatherstripping tape designed specifically for vehicles. Standard home insulation tape won’t hold up to UV exposure or temperature swings. Hardware stores like Home Depot carry suitable products.
Follow these steps for proper application:
1. Clean the top edge of your truck bed rails thoroughly to remove dirt, grease, and old adhesive
2. Cut foam tape to length, ensuring full coverage along both sides and the front rail
3. Press firmly into place, avoiding gaps or overlaps
4. Allow adhesive to cure before installing the canopy (check product instructions)
This tape prevents water intrusion, scratches from metal-to-metal contact, and vibration noise from a loose fit.
Recheck Seals After Installation
After mounting the canopy, inspect the seal from inside the bed. Look for gaps where light passes through, areas where foam appears compressed unevenly, and any signs of twisting or misalignment. If leaks develop later, replace the tape rather than layering sealant over it. Fresh foam ensures consistent compression and longer life.
Install Using Topper Clamps for Quick Attachment
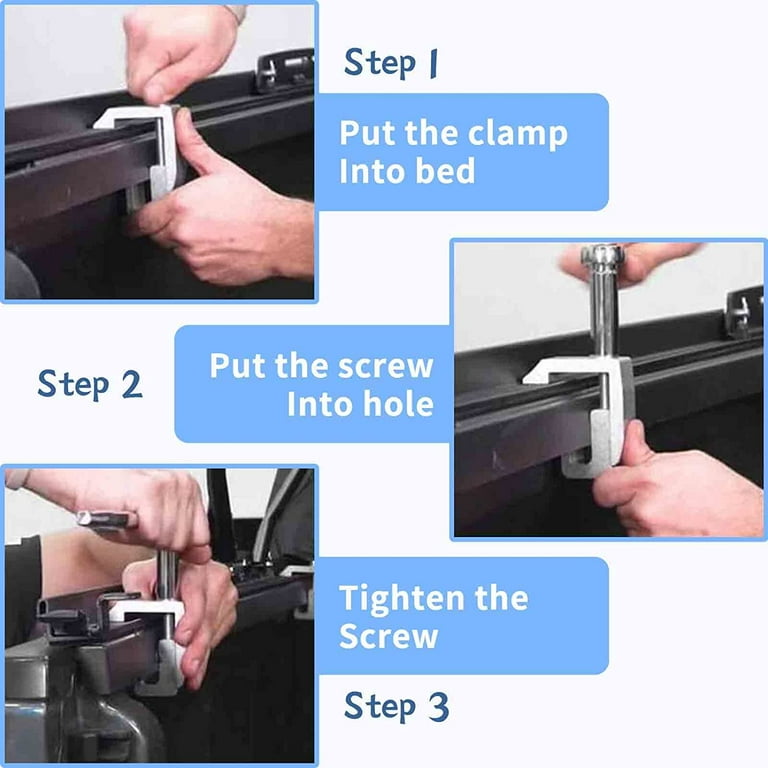
Clamps offer the fastest, most reversible way to secure a canopy. They work particularly well with aluminum toppers, which resist denting under clamp pressure.
Use the Correct Clamp Type and Quantity
Never substitute C-clamps for dedicated topper clamps. Real topper clamps are engineered to grip both the bed rail and canopy lip securely, minimizing slippage. Using C-clamps risks poor fit and potential damage.
Use at least two clamps per side, and three per side for long beds (8-foot). Position one near the cab, one at mid-bed, and one near the tailgate for long beds. This spacing distributes pressure evenly across the rail.
Maintain Clamp Tightness Regularly
Clamps loosen over time due to road vibration. Experienced users confirm clamps work well but require periodic tightening to stay secure.
To maintain proper tension:
– Check clamp tightness every 500 miles or monthly
– Retighten if you hear wind noise or notice movement
– Apply anti-seize compound to threads if you remove the canopy frequently
Pairing clamps with proper sealing tape improves stability and reduces stress on the clamps themselves.
Bolt Down With Angle Iron for Maximum Durability
For long-term security and durability, the bolt-down method with angle iron is the gold standard. Users who rely on this approach report no loosening even after years of heavy use.
Gather Required Materials
You’ll need:
– Aluminum or steel angle iron (approximately 1″ x 1″)
– Wood or aluminum brackets (seal wood against moisture if used)
– Bolts with large fender washers (¼” or 5/16″ diameter)
– Drill and metal-cutting bits
– Rust-resistant hardware such as stainless or coated fasteners
Follow These Installation Steps
- Position the angle brackets along the inside lip of your truck bed rails
- Align the canopy and mark drill points through the bracket, canopy, and rail
- Drill through all layers, ensuring holes are straight and clean
- Insert bolts with fender washers to spread pressure and prevent surface damage
- Tighten securely, but avoid over-torquing which can crack fiberglass
Use at least three bolts per side for balanced load distribution.
Why This Method Excels for Long-Term Use
This approach prevents loosening under vibration or stress, reduces fiberglass damage by eliminating clamping pressure points, supports accessories like roof racks or lighting bars, and distributes weight across a larger surface area. Once installed correctly, it requires minimal maintenance.
Prevent Common Installation Mistakes
Even experienced DIYers make errors that compromise safety and performance. Avoiding these common pitfalls ensures your canopy stays secure and leak-free.
Don’t Skip the Fender Washers
Using bolts without large fender washers concentrates pressure on a small area, risking dents or cracks, especially on fiberglass surfaces. Washers spread the load and protect the canopy finish.
Avoid Over-Tightening Clamps
Clamps that are too tight dig into fiberglass, causing permanent damage. Tighten just enough to eliminate movement, then check after your first few drives and adjust as needed.
Inspect for Weld Failures
One reported issue involves welds breaking on the side panels where the canopy meets the bed, often resulting from vibration fatigue or poor initial construction.
To prevent this:
– Inspect welds regularly for cracks
– Reinforce weak joints with additional bracing if needed
– Consider professional inspection for older or heavily used canopies
Maintain Your Canopy System for Years of Reliable Use
A well-installed canopy can last decades with proper care. Regular maintenance prevents small issues from becoming major failures.
Schedule Routine Inspections
Check every 3 to 6 months:
– Clamp tightness if you’re using a clamp system
– Bolt security and corrosion
– Condition of weatherstripping and replace if flattened or cracked
– Drainage paths and clear debris from corners and seams
Replace Worn Seals Promptly
Compressed or deteriorated foam tape won’t seal properly. Replacing it takes about 20 minutes and prevents costly water damage. Don’t wait until you see leaks inside the bed.
Use Rust-Resistant Hardware
In humid or snowy climates, stainless steel or galvanized bolts resist corrosion. Apply anti-seize compound during installation if you plan to remove the canopy later.
Consider Professional Installation for Peace of Mind
If you’re unsure about drilling into your truck or achieving a perfect seal, professional installation is a smart investment.
Benefits of Dealer Installation
- Proper sealing guaranteed with no guesswork
- Correct hardware and torque used for your specific canopy
- Warranty or workmanship guarantee often included
- Low cost at typically under $100
Many truck topper dealers offer this service and can recommend the best method for your canopy type and intended use.
Troubleshoot Common Canopy Problems
Even the best installations can develop issues over time. Here’s how to address them quickly.
Fix Water Leaks
Cause: Failed sealant or worn foam tape
Solution: Replace foam tape and reapply sealant at joints
Stop the Topper from Loosening
Cause: Loose clamps or failed bolts
Solution: Retighten clamps or upgrade to a bolt-down system
Reduce Wind Noise
Cause: Poor seal between canopy and bed
Solution: Improve weatherstripping to ensure full, even contact
Prevent Paint Damage
Cause: Metal-to-metal contact
Solution: Verify foam tape is in place and intact between all surfaces
Final Tips for Long-Term Canopy Success
Keep these essentials in mind for a secure, lasting installation:
- Always use foam tape as your first line of defense against leaks and scratches
- Choose bolt-down for fiberglass canopies since clamps can damage the surface
- Inspect welds annually, especially if you drive off-road or carry heavy loads
- Never use C-clamps because they aren’t designed for this application
- Prioritize rust-resistant hardware, particularly in wet or coastal climates
Frequently Asked Questions About Installing a Truck Bed Canopy
What is the best way to attach a canopy to a truck bed?
The best method depends on your needs. Clamps work well for frequently removed canopies, especially on aluminum toppers. Bolt-down with angle iron provides superior security and is preferred for long-term installations and fiberglass canopies. Both methods require proper foam weatherstripping to seal out water and protect your truck’s paint.
How many clamps do I need to install a truck bed canopy?
Use at least two topper clamps per side. For longer truck beds (8-foot), use three clamps per side. Position them near the cab, at mid-bed, and near the tailgate to distribute pressure evenly and prevent movement during travel.
Should I bolt down or clamp my truck canopy?
Bolt down if you want maximum security, plan to keep the canopy on long-term, have a fiberglass topper vulnerable to clamp damage, or plan to mount accessories like roof racks. Use clamps if you need frequent bed access, have an aluminum topper that handles clamp pressure well, or prefer tool-free removal.
Can I install a truck canopy myself?
Yes, most DIYers can install a canopy using either clamps or a bolt-down method. You’ll need basic tools like a drill, wrenches, and measuring equipment. If you’re uncomfortable drilling into your truck bed or want guaranteed sealing, professional installation is typically available for under $100 through truck topper dealers.
How do I prevent water from leaking under my truck canopy?
Apply outdoor-rated foam weatherstripping tape along the top edge of your truck bed rails before installing the canopy. Ensure full coverage with no gaps, and inspect the seal from inside the bed after installation. Replace the tape when it becomes compressed or worn rather than layering sealant over it.
What maintenance does a truck bed canopy require?
Inspect your canopy every 3 to 6 months. Check clamp tightness or bolt security, examine weatherstripping for wear, clear drainage paths of debris, and look for cracks in welds. Replace foam tape when it deteriorates and use rust-resistant hardware to extend the life of your installation.
Key Takeaways for a Secure, Weatherproof Canopy Installation
Installing a canopy over your truck bed comes down to three critical factors: proper sealing, correct hardware, and regular maintenance. Foam weatherstripping tape protects against both leaks and paint damage, making it essential regardless of which attachment method you choose. The bolt-down approach with angle iron and fender washers delivers the best long-term security and works especially well for fiberglass canopies. Clamps offer convenience and reversibility but require periodic tightening and work best with aluminum toppers.
Your next step is simple: gather your materials, clean your bed rails thoroughly, and apply fresh foam tape before mounting your canopy using the method that matches your priorities.


