
Installing a Retrax tonneau cover transforms your pickup truck into a secure, weatherproof hauling machine that protects cargo from rain, dust, and theft. Retrax retractable covers like the RetraxPRO XR, RetraxONE XR, and RetraxPOWERTRAXPRO are engineered for DIY installation without professional help. This guide walks you through every step of installing your Retrax cover, from preparing the truck bed to testing the locking mechanism, so you can complete the job in about two hours with basic tools.
Prepare Your Vehicle and Components for Installation
Before lifting the heavy canister into your truck bed, take time to prepare both your vehicle and the Retrax kit components. This preparation prevents installation errors and ensures a smooth assembly process.
Remove All Protective Films
Unbox your Retrax kit and remove protective films from every component. This includes the canister, side rails, cover panels, and drain tubes. Leaving film on any surface can trap moisture and cause adhesion issues over time, leading to cosmetic damage or functional problems.
Inspect Your Truck Bed
Check your truck bed for several key conditions before proceeding. Confirm the bulkhead (the wall behind the cab) is flush and undamaged. Clean the bed rails thoroughly, removing any debris or bed liner buildup. Identify factory drain holes near the wheel wells, as these will route water away from your cargo. Avoid drilling into the bed unless absolutely necessary, as this may void your vehicle warranty.
Pro Tip: If you have a spray-in bed liner, use existing plug points for drain tubes. Cut only through the liner with a ½-inch hole saw to avoid damaging the truck bed.
Gather Required Tools
Confirm you have all necessary tools before starting. You will need a 1/8-inch Allen wrench and a 6 mm Allen wrench (both included in the kit). Gather a 14 mm wrench, a T25 Torx bit, a tape measure, a sharp utility knife, and a torque wrench (recommended for accurate 5 ft-lbs readings). Keep all shims, spacers, and Nylock nuts from the hardware kit, as these components are critical for proper alignment.
Position the Retrax Canister Correctly

The canister houses the rolling cover mechanism and must be positioned correctly to ensure smooth operation and proper sealing. Taking time to align it properly now prevents binding and operational issues later.
Align for Proper Orientation
Place the spiral canister in your truck bed with the correct orientation. The bulb seal should face the tailgate, while the flap seal faces the cab. Rest the front of the canister flush against the bulkhead, ensuring it sits level and centered.
Center Side-to-Side
Use a tape measure to confirm equal clearance from the inner bed walls on both sides. Aim for approximately one inch of clearance on each side. This symmetry is critical because a misaligned canister causes cover binding and uneven rail tension during operation.
Why It Matters: An off-center canister forces the cover to travel at an angle, which creates friction, premature wear, and potential damage to the rolling mechanism.
Hold the canister in place while attaching the first rail. Use ropes or straps for temporary securing if working alone, or have a helper hold it steady.
Assemble the Side Rails (Passenger Side First)
Side rail assembly is the most detailed portion of the installation. Start with the passenger-side rail, then mirror all steps exactly for the driver’s side.
Identify Rail Sides Correctly
Passenger-side and driver-side rails are not interchangeable. The passenger-side rail has a hole near the tailgate end. The driver’s side has the hole at the cab end. Look for the slanted outward opening to confirm correct identification before proceeding.
Load Nylock Nuts
Flip the rail upside down and insert six Nylock nuts into the internal channel. The nylock side of each nut must face downward to ensure secure bolt engagement. These nuts accept all rail fasteners throughout the installation.
Install Incap and First Latch Stop
Slide the incap (end cap) onto the rail end, aligning it with the final Nylock nut. Insert the short Allen-head bolt and tighten to 5 ft-lbs. Do not overtighten, as this can crack the plastic component. Install the front latch stop next, placing it inward-facing against the adjacent nut. Insert the bolt but leave it loose for later adjustment.
Attach Clamp Assemblies
Loosen the clamp bolt and pull the P-clamp open. Tighten the adjustment nylon screw until it sits flush with the clamp interior. Position the clamp on the rail at the designated location, then tighten the clamp bolt to 5 ft-lbs. Repeat this process for the second clamp and the rear latch stop.
Visual Cue: The final latch stop aligns with the incap installed earlier.
Pre-Tighten and Secure
Flip the rail right-side up. Insert long Allen-head bolts into the remaining Nylock nuts but do not fully tighten them. Alignment adjustments come later. Use a small Allen wrench to fasten the set screw through the incap-to-rail hole, which locks the rail end in place.
Repeat all steps for the driver’s side rail, mirroring the passenger-side placement exactly.
Attach Rails to the Canister
With both rails assembled, you now connect them to the canister. This step requires careful alignment to prevent binding during cover operation.
Align and Slide Into Place
Match the square notch on the rail with the Nylock channel on the canister. Slightly tilt the rail upward and slide it forward. The cover blanket enters the rail channel while the rail top slides under the canister. Take your time with this motion to ensure smooth engagement.
Bolt Into Position
When the rail and canister holes align, insert the Torx-head bolt using the T25 bit. The bolt cuts its own threads, so expect initial resistance. Tighten to 5 ft-lbs once engaged. Both rails must attach identically to prevent operational issues.
Critical: Misalignment at this stage causes binding, uneven rolling, and potential damage to the cover mechanism.
Adjust Front and Rear Latch Stops
Latch stops define the travel limits of your Retrax cover. Proper adjustment ensures full closure without overextension and creates a weatherproof seal.
Set Front Latch Stop
Position the front latch stop 1/16 inch from the Torx bolt. Use the included spacer tool to achieve this precise measurement. Tighten to 5 ft-lbs. Some models require 1/8-inch spacing, so check your specific manual.
Set Rear Latch Stop
Close the tailgate and place the plastic spacer on the tailgate edge. Slide the rail forward until it contacts the spacer, then remove the spacer. This sets the ideal gap for full closure. Position the rear latch stop at this point and tighten to 5 ft-lbs.
Install and Secure Clamp Assemblies
The clamp system secures the rails to your truck bed. Proper clamp installation prevents rattling and ensures the rails stay aligned during use.
Install Rear Clamps
Reach into the bed cap (wheel well area) to check for obstructions. Back out the clamp bolt, rotate the clamp downward to pass behind the obstruction, then rotate it back up. Re-engage the bolt and tighten to 5 ft-lbs. Confirm the clamp allows full rail movement without binding.
Install Front Clamps
Pull the clamp apart and rotate it downward to verify a clear path. Rotate back up and position the clamp up to the front latch stop. Tighten the bottom bolt to 5 ft-lbs. Adjust the set screw until it contacts the bed cap, then tighten the opposite clamp bolt to 5 ft-lbs.
Check: Protruding bolts cause binding. Ensure all clamp bolts sit flush with the rail surface.
Align and Level the Rails
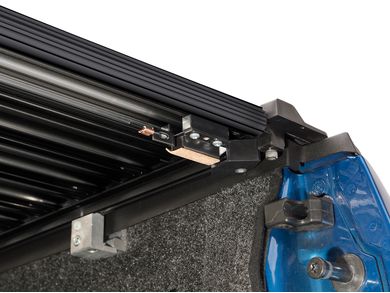
Rail alignment determines how smoothly your Retrax cover rolls. This step requires precision and careful measurement.
Verify Parallelism
Measure the distance between rails at the front (near canister) and rear (at clamps). These measurements must be equal. Adjust if necessary by loosening clamp bolts and turning the adjustment screws.
Equalize Bed Cap Clearance
Use set screws to adjust rail height until the gap between the rail and bed cap is equal on both sides. Hold the rail level and tighten all clamp bolts to 5 ft-lbs. Confirm the internal clamp bolt is fully inset, as protrusion causes friction and binding.
Set the Center Latch Stop
Open the cover halfway and place the center latch stop equidistant from the tailgate on both sides. This ensures the cover stops reliably in the mid-position without drifting. Tighten to 5 ft-lbs.
Install Drain Tubes and Trim Flap Seal
Proper drainage and sealing complete the weatherproof installation. This step prevents water intrusion and protects your cargo.
Install Drain Tubes
Remove protective caps from the canister drains. Insert the ½-inch drain tube into the canister hole and feed it through the factory bed hole. Push until you hear a distinct click, which indicates secure seating. Allow 20-30 minutes for this step, as the snap-in design resists initial insertion.
Routing Tip: Angle tubes away from the cab to follow the natural bed slope, ensuring water drains properly.
Trim Flap Seal
Extend the flap seal over the bulkhead. Use a sharp knife to trim the seal so it just overlaps the bulkhead without excess. Make clean, straight cuts on both sides. The goal is no gaps (which cause leaks) and no overhang (which causes wind noise).
Final Checks and Operational Testing
After completing installation, verify everything works correctly before using your Retrax cover regularly.
Test Cover Movement
Open and close the cover manually. Confirm smooth rolling without scraping or grinding. The cover should fully retract and extend without resistance.
Fix Binding Issues
If binding occurs, loosen the clamp bolts slightly and adjust the set screws for realignment. Re-tighten to 5 ft-lbs once the cover moves freely.
Verify Lock Function
Test the lock with supplied keys. The lock must engage fully only when the cover is completely closed. Keys should turn smoothly and remove easily. Do not force the lock, as this indicates the cover is not fully closed.
Remove All Protective Films
Double-check that all protective films are removed from rails, canister, and cover surface. Sun exposure can bake remaining film onto components, making removal difficult or impossible later.
Troubleshoot Common Issues
Even with careful installation, issues can arise. Knowing how to address them saves time and frustration.
Cover Won’t Align
Misaligned rails or canister cause this issue. Recheck the 1/16-inch gap and realign rails before final tightening.
Water Leaking
Wrinkled weather-stripping, clogged drain tubes, or an untrimmed flap seal cause leaks. Reinstall stripping, flush tubes, and re-trim the flap seal.
Drain Tubes Won’t Snap In
The snap-fit design is tight by design. Be patient and try twisting slightly while pushing. Do not force the connection.
Cover Binds During Operation
Protruding bolts, debris in the T-slot, or misaligned rails cause binding. Clean tracks, check bolt flushness, and realign rails as needed.
Lock Malfunctions
Debris in the lock cylinder or misalignment causes lock problems. Clean the lock cylinder thoroughly and ensure the cover is fully closed before attempting to lock.
Expert Tips for a Perfect Installation
These tips come from experienced installers and help ensure professional-quality results.
Watch Installation Videos First
Retrax provides model-specific videos for the RetraxPRO XR, RetraxONE XR, and RetraxPOWERTRAXPRO. Watching these videos before starting helps you understand the process and anticipate challenges.
Use a Torque Wrench
A torque wrench ensures consistent 5 ft-lbs on every bolt. This prevents cracked plastic components and loose hardware that causes alignment problems.
Have a Helper
Two people make canister positioning and rail alignment faster and more accurate. The extra set of hands is especially helpful during the rail-to-canister attachment step.
Document Your Installation
Take photos during each step of the process. These photos help with warranty claims, troubleshooting, or if you need to remove and reinstall the cover later.
Don’t Rush Drain Tube Installation
This is the most time-consuming step. Allow 20-30 minutes per tube, and do not force connections.
Frequently Asked Questions About Retrax Tonneau Cover Installation
How long does it take to install a Retrax tonneau cover?
Most DIY installers complete the job in approximately two hours. Experience with similar automotive projects and having a helper can speed up the process, while bed liner modifications may extend the timeline.
Can I install a Retrax cover by myself?
Yes, solo installation is possible with a lifting aid like ropes or straps to hold the canister in place. However, having a helper significantly improves accuracy during rail alignment and canister positioning.
Do I need to drill into my truck bed?
Drilling is not typically required. Use factory drain holes and existing access points whenever possible. Drilling may void your vehicle warranty, so proceed only if no alternative exists.
What tools come with the Retrax kit?
The kit includes 1/8-inch and 6 mm Allen wrenches, a spacer tool, and all necessary bolts, nuts, and washers. You will need to provide a 14 mm wrench, T25 Torx bit, tape measure, utility knife, and torque wrench (recommended).
How do I know if my rails are properly aligned?
Measure the distance between rails at both the front and rear. These measurements must be equal. Additionally, the gap between rails and bed caps should be equal on both sides. The cover should roll smoothly without binding when operated manually.
Key Takeaways for Installing Your Retrax Tonneau Cover
Installing a Retrax tonneau cover is a rewarding DIY project that takes approximately two hours with basic tools. The process requires careful attention to alignment, particularly when positioning the canister and assembling the side rails. Keeping all hardware (shims, spacers, and Nylock nuts) is essential, as these components ensure proper function and sealing.
The most critical steps involve achieving rail parallelism and setting correct latch stop gaps. Use the included spacer tool for precise 1/16-inch or 1/8-inch measurements depending on your model. Drain tube installation requires patience, so allow 20-30 minutes per tube without forcing the snap-fit connection.
Once installed, your Retrax cover provides weatherproof cargo protection, improved fuel efficiency through aerodynamics, and theft deterrence with its locking system. With proper installation and occasional maintenance, your cover will deliver years of smooth, silent operation. For model-specific variations or troubleshooting assistance, contact Retrax support at 1-800-206-4070.


