
If you have recently purchased a tonneau cover or need to replace damaged clamps, knowing how to install tonneau cover clamps properly is essential for securing your truck bed, protecting cargo from weather damage, and maintaining a sleek appearance. These clamps form the backbone of a no-drill installation system, allowing you to attach your cover without permanent modifications to your truck. Whether you have a soft roll-up, folding, or clamp-mount tonneau cover, correct installation ensures a tight, rattle-free fit that withstands highway speeds and rough terrain.
This comprehensive guide walks you through installing clamps for every major tonneau cover type, including alignment techniques, torque recommendations, and protective measures to prevent truck damage. You will also learn best practices for clamp placement, routine maintenance, and troubleshooting common issues. By the end, you will have a secure, professional-quality installation that protects your cargo and enhances your truck for years to come.
Soft Roll-Up Cover Clamp Installation

Soft roll-up tonneau covers rely on durable clamps to grip the side rails and truck bed edges. These systems offer quick setup and easy removal, making them ideal for truck owners who want flexibility without sacrificing security.
Align Side Rails Before Installing Clamps
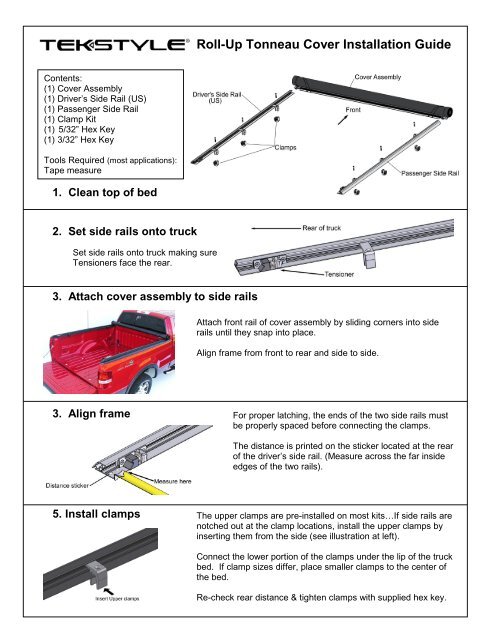
Start by positioning the side rails of the tonneau cover along the top edge of your truck bed rails. Make sure they run parallel and sit flush with the outer edge of the bed. Misaligned rails lead to uneven clamp pressure and gaps in coverage.
Hold or temporarily secure the front end of the cover in place to prevent shifting during installation. Check that both sides are level and equidistant from the cab before proceeding.
Slide Clamps onto Side Rails
Take the pre-assembled clamps and slide them onto the side rails. Place at least one clamp near the front, one at the center, and one close to the rear of each side rail. For longer beds measuring 6.5 feet or more, add an extra clamp midway on each side for better stability.
Even distribution of clamps prevents sagging and reduces wind lift at highway speeds. Most kits include four to six clamps, and using all provided clamps ensures the best performance.
Engage Teeth into Rail Grooves
Each clamp has teeth or ridges designed to lock into matching grooves on the side rail. Align these carefully so the teeth fully seat into the grooves before tightening. Visually inspect each connection to confirm proper engagement.
If the teeth are not fully engaged, the clamp can slip under stress, leading to partial detachment or fabric tearing over time.
Tighten Without Overdoing It
Begin by finger-tightening each clamp to allow minor adjustments during alignment. Once aligned, use a socket wrench or adjustable wrench to complete the tightening process. Apply moderate torque, turning just a quarter to half turn past finger-tight.
Over-tightening risks bending aluminum rails, cracking plastic components, and damaging the vinyl or fabric seal. If a clamp feels stiff before full engagement, stop and recheck the alignment.
Test the Cover Fit
After securing all clamps, roll the cover back over the bed. Pull gently on the sides and rear to test tension. The cover should feel taut with no looseness or shifting.
If the cover sags or shifts, loosen the affected clamps and reposition them as needed. Ensure the tail end seals tightly against the tailgate for complete protection.
Folding Cover Clamp Installation
Folding tonneau covers often come with pre-installed clamps, especially models from brands like MOSTPLUS. These clamps use lever-action or screw-tight mechanisms for hand-operated security without tools.
Check for Pre-Mounted Clamps
Inspect your folding cover frame to see if clamps are already attached via aluminum or stainless steel screws. If clamps are missing or loose, mount them now by aligning the mounting holes on the clamp with the screw points on the frame.
Insert screws and turn them by hand to secure initial placement. Do not fully tighten yet, as you will need to make adjustments during the installation process.
Fold Panels for Access
Gently fold the cover panels upward to access all clamp locations. This gives you clear visibility and room to work without straining the hinges or frame components.
Ensure the folding motion is smooth and free of resistance. Stiff hinges may indicate misalignment or obstruction that should be addressed before proceeding.
Snap Clamps onto Bed Rails
Lift each clamp and press it down onto the truck bed rail edge. Push firmly until you hear or feel a click, indicating full engagement with the rail.
Some models require a secondary twist or lever lock for complete attachment. Follow manufacturer instructions closely, as engagement methods vary by design.
Final Tighten and Recheck
After snapping all clamps into place, tighten any tensioning screws or handles to increase grip. Recheck every clamp by tugging upward to ensure none lift or wobble.
If a clamp feels loose, remove it and inspect for debris or damage. Re-seat and re-snap, or replace the clamp if it shows cracks or wear. Installation typically takes five to ten minutes with experience, while first-time users may need up to fifteen minutes.
Clamp-Mount System Setup (Aussie-Style)
Some tonneau systems, like the Aussie tonneau cover, use a comprehensive clamp-mount system that includes side plates, center poles, and tailgate modifications. This approach provides a secure, reversible fit without drilling.
Prepare Side Mounts
Attach the clamp mounts to the aluminum side plates that will anchor the side clamps along the bed rails. Apply a small strip of three M soft-tape to each contact point to prevent scratches and protect your truck finish from metal-on-metal contact.
This padding also reduces vibration noise and prevents galvanic corrosion between dissimilar metals over time.
Remove Tailgate Liner
Use the included liner removal tool or a flathead screwdriver to gently pry off the plastic tailgate liner. Work slowly to avoid cracking clips or damaging the trim.
Once removed, locate the white plastic clips underneath. These original equipment clips must be replaced with the new tonneau-compatible clips included in your kit.
Replace Old Clips with New
Use pliers to pull out the old white clips. They often resist removal, so apply steady pressure to avoid breaking the housing. Insert the new tonneau-compatible clips from beneath the tailgate and push until they snap securely into place.
These new clips are specifically designed to accept the rear clamps of your cover system.
Reinstall Tailgate Components
Remove the rubber gasket from the old liner and transfer it to the new aluminum rear plate. This maintains a weather-tight seal when the tailgate closes.
Position the aluminum rear plate over the tailgate and reattach the liner. Secure with screws, ensuring all fasteners are tight and flush. Operate the tailgate a few times to confirm no interference with the new hardware.
Install Center Support Pole
Insert the center support pole through the front and rear openings in the tonneau cover. Extend it outward on both ends until the cover feels taut and stable.
This pole prevents sagging in the center and improves wind resistance at highway speeds. Some models auto-lock, while others require manual tightening.
Attach Cover Using Clamps
Begin at the rear of the cover by clipping the rear clamps into the newly installed tailgate clips. Move to the sides by attaching the side clamps to the side rail mounts, repeating on the opposite side.
Finish at the front by securing the front clamps last to complete the enclosure. Installing in this sequence prevents tension buildup that makes rear alignment difficult.
Final Inspection Steps
Walk around the truck and verify that all clamps are fully engaged, the pole is extended and locked, and the tailgate gasket is seated properly. Check for any gaps or looseness around the perimeter.
Operate the tailgate to ensure smooth movement without binding or shifting. The cover should not interfere with opening and closing.
Key Tips for Secure Installation
Ensure Full Tooth Engagement
Misaligned teeth are the leading cause of clamp failure over time. Always visually confirm that teeth are fully seated in rail grooves with no portion hanging off or skewed.
Even slight misalignment can lead to slippage under vibration or high wind conditions, compromising the security of your cargo.
Avoid Over-Tightening
Use moderate force when tightening clamps with tools. A good rule is finger-tight plus a quarter to half turn with a wrench. When in doubt, err on the side of looser tension, as you can always tighten slightly later if needed.
Over-tightening leads to warped rails, stripped threads, and cracked plastic housings that require replacement.
Distribute Clamps Evenly
Place clamps at strategic load points near the front, center, and rear of each side rail. For eight-foot beds, consider adding a second center clamp per side for enhanced stability.
Balanced pressure prevents uneven stress and extends the life of both the cover and the truck bed finish.
Use Protective Padding
Always apply three M soft-tape or similar padding where clamps contact painted surfaces. This simple step prevents scratches, reduces noise, and extends the life of both the clamp and your truck finish.
Replace the tape periodically if it shows signs of wear or adhesive failure.
Maintenance for Longevity
Inspect Clamps Regularly
Check clamps every three to six months for loosening from vibration, corrosion in coastal or winter-salt areas, and wear on teeth or screw threads. Retighten any loose clamps and clean corroded parts with mild soap and water.
Early detection of issues prevents more serious problems during highway driving or severe weather.
Clean and Lubricate Annually
Wipe down clamps and rails with a damp cloth to remove dirt and debris. Avoid abrasive cleaners that can damage finishes or strip protective coatings.
Once a year, apply a silicone-based lubricant to screw threads, hinges, and moving parts. Do not use oil-based sprays, as they attract dust and grime.
Troubleshooting Common Issues

Clamp Will Not Snap into Place
Check for debris in the rail groove, misaligned cover position, or incorrect clamp orientation. Clean the area thoroughly and realign the cover before attempting to snap the clamp again.
Try snapping from a slight angle if direct pressure fails. Ensure the clamp is oriented correctly for your specific model.
Cover Flaps in Wind
Insufficient clamps, loose or misaligned clamps, or a missing center pole commonly cause wind flapping. Add more clamps, retighten existing ones, and verify the center pole is properly installed and extended.
Check that all clamps are fully engaged and that the cover is seated correctly in the rail grooves.
Tailgate Will Not Close Properly
Improper gasket placement, clash with the rear clamp, or an unsecured liner can prevent tailgate closure. Recheck the tailgate assembly and ensure the rubber gasket is seated properly and the liner is flush with the surface.
Verify that the rear clamps are not interfering with the tailgate mechanism before forcing it closed.
Replacement and Support Options
Where to Buy New Clamps
Lost or damaged clamps can be replaced easily by ordering directly from the manufacturer or purchasing universal clamp kits online. Most kits include four to eight clamps, fasteners, and an installation guide.
Always verify model compatibility before purchasing to ensure proper fit and function.
Get Help from Support
Contact customer service for fit confirmation, step-by-step video help, or troubleshooting advice. Many brands offer live chat or phone support with product specialists who can walk you through tricky installation steps.
Key Takeaways for Installing Tonneau Cover Clamps
Installing tonneau cover clamps does not require specialized tools or expertise, but it does demand attention to detail for a secure, long-lasting fit. Whether you are setting up a soft roll-up, folding, or clamp-mount system, success depends on proper alignment of teeth and grooves, even spacing of clamps at front, center, and rear positions, controlled tightening to avoid damage, and use of protective padding to preserve your truck finish.
With the correct technique, you will achieve a tight, rattle-free seal that withstands wind, rain, and rough terrain. These clamps are built to last, and with routine checks and annual maintenance, your tonneau cover will deliver years of reliable service.
Now that you know how to install tonneau cover clamps correctly, you can enjoy peace of mind every time you hit the road, knowing your cargo is secure and your truck looks sharp.
Frequently Asked Questions About Installing Tonneau Cover Clamps
How long does it take to install tonneau cover clamps?
Installation time varies by cover type and experience level. Soft roll-up clamp installation typically takes ten to fifteen minutes, while folding cover clamps with pre-installed components take five to ten minutes. First-time installers should budget extra time for alignment adjustments.
Can I install tonneau cover clamps without drilling my truck bed?
Yes, all modern tonneau cover clamp systems are designed for no-drill installation. Clamps attach directly to the truck bed rails or tailgate edges using the existing mounting points, making the process completely reversible.
How do I know if my clamps are properly tightened?
Properly tightened clamps are secure but not overly strained. Finger-tighten first, then add a quarter to half turn with a wrench. The clamp should not wiggle or lift when tugged, but you should not see deformation or stress marks on the rail or clamp.
What should I do if a clamp will not snap onto the rail?
Clean the rail groove thoroughly to remove debris or old tape residue. Verify the clamp orientation matches your model and that the teeth align with the groove. Try pressing at a slight angle if direct pressure fails, or inspect the clamp for damage.
How often should I check my tonneau cover clamps?
Inspect clamps every three to six months, or before long trips and seasonal changes. Check for loosening from vibration, corrosion in harsh environments, and wear on teeth or threads. Retighten or replace components as needed to maintain secure attachment.


