
If you’re looking to secure your truck bed, improve fuel efficiency, and protect your cargo from the elements, installing a TruXedo tonneau cover is a smart upgrade. The TruXedo TruXport model offers a sleek, roll-up design that’s both durable and easy to operate. With the right tools and guidance, most truck owners can complete the installation in under an hour. This guide walks you through every step, from prep to final tension adjustment, so you can confidently install your TruXedo tonneau cover on models like the 2021 and 2024 Ford F-150 or any compatible pickup.
You’ll learn how to align rails, secure clamps, apply seals correctly, and avoid common mistakes that lead to leaks or misalignment. Whether you’re a first-time installer or a seasoned DIYer, this step-by-step process ensures a weather-tight fit and smooth operation for years to come.
Prepare the Bulkhead Seal
Before mounting any hardware, start with the front seal where the cover meets the cab. This step ensures a weather-tight fit and depends on your truck’s bed liner type.
Check Bed Liner Compatibility
The bulkhead seal must be installed only if your truck does not have a drop-in plastic bed liner that wraps over the front bulkhead. If it does, skip this step. Installing the seal on top of a drop-in liner could cause misalignment and poor fit.
For spray-in liners or bare metal, apply the seal directly to the top edge of the bulkhead. If adhesion fails due to the liner’s textured surface, attach the seal to the bottom front edge of the cover’s C-channel instead.
Apply the Seal Properly
Clean the surface with rubbing alcohol and a lint-free rag. Let it dry completely before proceeding.
Peel back about 6 inches of the adhesive backing. Align the seal starting at one side, stretching it straight across to the other. Match the semi-circular cutout on the seal to the passenger-side contour of your truck. Press firmly as you continue removing the backing and adhering the rest. Trim excess with scissors or a utility knife. Go over the entire length with firm pressure to ensure full bonding.
Pro Tip: If reusing an old but intact seal, clean it thoroughly and check for cracks. Replace only if damaged.
Install Side Rail Weather Seals
Next, prepare the side rails with end seals to prevent water from entering at the back corners. This step is essential for maintaining weather resistance across all seasons.
Position Rails Correctly
Flip both side rails upside down to access the sealing surface. Identify the correct foam strips from the kit that match the rail ends.
Look for the “P” marking on the passenger-side corner cap near the cab. This marking helps confirm orientation during setup and prevents installation errors.
Attach the Foam Seals
Peel off the protective film from the adhesive side. Press the seal onto the rail end, following its exact shape. Use firm, even pressure along the full length. Repeat on the opposite side. Flip both rails back upright.
Note: Do not install the tail rail end seals yet. Wait until after rail alignment for a perfect fit. Keep spare seals from the kit in case you need replacements later.
Place the Cover and Align Rails
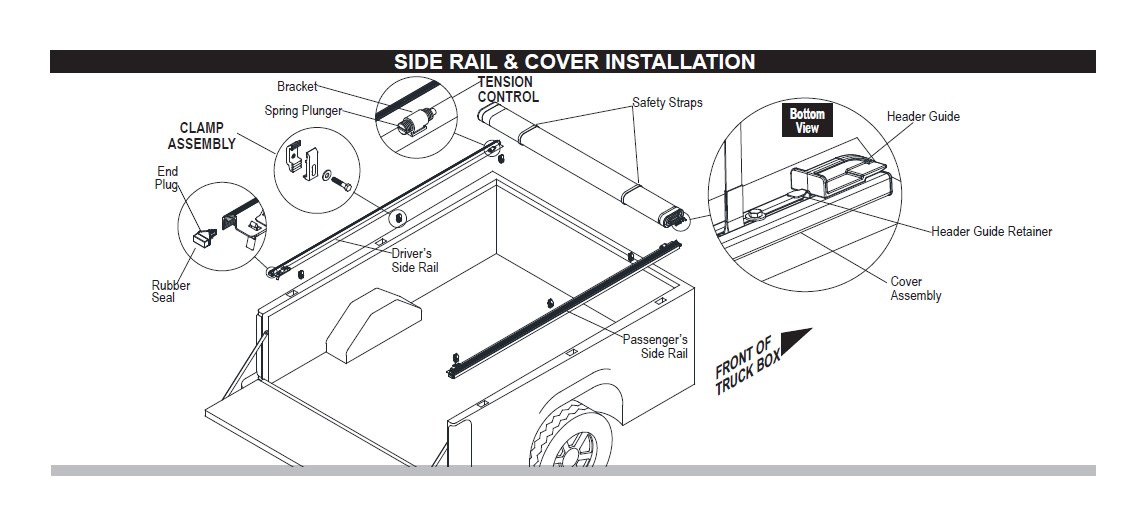
Now it’s time to position the main components on your truck bed. Proper initial placement makes the rest of the installation much smoother.
Lay the Cover First
Back your truck into an open area with space behind. Drape the tonneau cover over the front bulkhead, ensuring the open C-channel faces rearward to accept the bulkhead. The bar side with support bows should face toward the cab. Feed the mounting straps under the bed from one side to the other to help center the cover.
Mount the Side Rails
Place the driver-side rail onto the driver-side bed cap. Repeat with the passenger-side rail. Slide the front corner cap into the hollow C-channel at the cover’s front edge. Lower each rail so it rests flat on the bed cap. Ensure both rails run parallel and are centered side-to-side.
Warning: Keep all clamps loose or hand-tight only at this stage to allow adjustments. Premature tightening can cause misalignment that’s difficult to correct later.
Install Clamps (Hand-Tight Only)
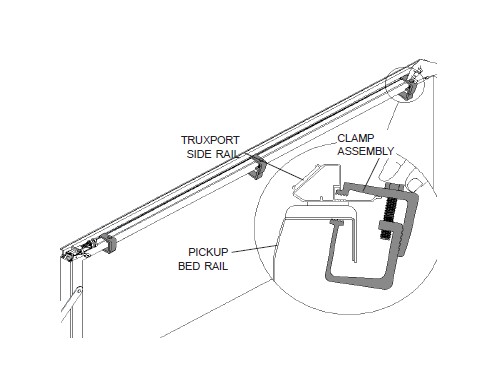
Each side uses three clamps, front, middle, and rear, to secure the rails to the bed caps. Proper clamp positioning is critical for both security and smooth operation.
Clamp Installation Steps
Loosen each clamp bolt fully. Lift and rotate the clamp sideways. Slide the bottom tab under the bed cap lip. Rotate the top back over the rail. Make sure no wiring, trim, or obstructions are caught underneath. Engage the clamp teeth into the rail’s grooves.
Position the front clamp as far forward as possible without hitting the bulkhead. Position the middle clamp near the bed center. Position the rear clamp as far back as clearance allows. Tighten each by hand only for now.
Safety Note: Slightly tightening the rear clamps prevents rail slippage and protects your paint during alignment. Don’t skip this step.
Align Rails Using 1/8-Inch Gap
Precise rail alignment ensures smooth rolling and proper sealing at the tailgate. This step separates a professional-quality install from a sloppy one.
Use a Plastic Shim for Accuracy
Take a 1/8-inch thick hard plastic shim or feeler gauge. Slide it between the inner wall of each side rail and the tailgate header. Adjust the rail position forward or backward until the shim fits snugly. This confirms 1/8-inch clearance. Verify both sides have equal spacing.
Check Tailgate Alignment
Close the tailgate and inspect for consistent gap between rails and tailgate header. The rear tail rail should align with the stop groove in the side rails when rolled back.
Expert Tip: Too tight causes binding. Too loose risks water leaks. The 1/8-inch gap is optimal for both operation and weather sealing.
Final Clamp Tightening (7 ft-lb Torque)
Once aligned, secure the clamps to lock everything in place. Proper torque specification prevents damage while ensuring a secure fit.
Torque Clamps in Sequence
Roll the cover fully forward toward the cab. Tighten all clamps using a ½-inch socket wrench. Torque each bolt to 7 ft-lb. This ensures full tooth engagement without damage. Follow this order: front clamp, middle clamp, then rear clamp. Repeat on the other side.
Warning: Do not overtighten. It can strip threads or deform the bed cap. Use a torque wrench if available for precision.
Post-Tightening Inspection
Roll the cover back toward the tailgate. Confirm the support bows drop into the rails freely. If a bow hits a clamp, slightly loosen and reposition the clamp.
Install Tail Rail End Seals
With rails locked in position, now seal the back corners where the cover meets the tailgate. These seals complete the weatherproofing system.
Apply Rear Weather Seals
Unroll the cover fully. Retrieve the tail rail foam seals from the kit. Match the correct shape to the tail rail corner on each side. Peel off the adhesive backing. Press firmly into place where the cover contacts the tailgate. Ensure full contact with no gaps or lifting.
These seals block water entry when the tailgate is closed and improve overall weather resistance significantly.
Adjust Spring Tension for Smooth Operation
The TruXport cover uses a spring-loaded mechanism for automatic opening. Proper tension ensures effortless operation and prevents premature wear.
Balance the Tension
If the cover feels too stiff or too loose when rolling, release the driver-side latch first. Then release the passenger-side latch. Push in the lever and rotate the thumb nut to adjust tension. Turn clockwise to increase tension. Turn counterclockwise to reduce. Re-engage latches and test.
Test for Proper Tension
Tap the cover surface. It should sound drum-like, not saggy or wrinkled. Roll forward and back. Motion should be smooth and consistent. Adjust until the cover stays in place at any position.
Pro Tip: Ideal tension allows one-handed operation and self-opening after unlatching.
Test Opening, Closing & Latch Function
Finalize installation by verifying full functionality. This step confirms everything works correctly before considering the job complete.
How to Open the Cover
Pull the release cable on either side. The cover will pop open slightly due to spring assist. Grab the tail rail and roll it forward manually.
How to Close Properly
Roll the cover rearward. Lower the tail rail until it reaches the latch on both sides. Press down firmly with both hands until you hear a distinct click. Lower the tailgate. It should not open unless the cover is unlatched.
Final Walk-Around Check
With tailgate closed, confirm uniform 1/8-inch gap on both sides. Look for light gaps or seal separation, especially at front and corners. Inspect for smooth rolling action in both directions. Ensure latches engage securely and resist lifting.
Note: A properly installed cover enhances aerodynamics, improves security, and keeps cargo dry.
Handle Special Cases & Common Issues
Even with careful installation, some issues may arise. Here’s how to fix them fast without professional help.
Adjust for Aftermarket Accessories
Trucks with aftermarket bed liners, rails, or lighting may require minor tweaks. Recheck clamp clearance. Reposition rails if accessories interfere with rolling. Use shims or spacers if clamps don’t seat properly.
Troubleshoot Water Leaks
If water appears at the front, poor bulkhead seal adhesion is likely the cause. Re-clean and reapply, or try underside mounting.
If leaks occur at corners, misaligned tail rail seals are probably at fault. Reinstall end seals with better pressure.
If moisture appears along rails, gaps from misalignment are the issue. Recheck 1/8-inch gap and re-torque clamps.
Stop Rattling or Loose Rails
Loose clamps or worn foam seals cause rattling. Fix this by re-tightening all clamps to 7 ft-lb. Replace degraded seals from spare kit parts.
Fix Stiff Rolling
Over-tensioned springs or rail misalignment cause stiff rolling. Fix by reducing spring tension via thumb nut. Recheck rail parallelism and clearance.
Maintain Your Tonneau Cover
Keep your TruXedo cover looking and working great with minimal upkeep. Regular maintenance extends the life of your investment significantly.
Cleaning Routine
Wash the cover every few weeks with mild soap and water. Use a soft cloth or sponge. Avoid abrasive pads. Rinse thoroughly and dry with a microfiber towel.
Avoid harsh solvents, degreasers, or pressure washers. They degrade vinyl and adhesives quickly.
Annual Seal Inspection
Once a year, check all foam seals for cracking, shrinking, or detachment. Clean adhesive surfaces and reattach if loose. Replace seals using spares or order replacements from TruXedo.
Long-Term Storage Tips
In extreme winter climates, consider removing the cover if not in use. Store flat in a cool, dry place away from direct sunlight.
Verify Warranty & Access Support
Your TruXedo TruXport is backed for long-term performance. Understanding your coverage protects your investment.
Warranty Details
The 5-year limited warranty covers material and workmanship defects. The cover is made in the USA. Register online at TruXedo.com to activate support benefits.
Get Help When Needed
Download the official install sheet for your model. Access the Install Sheet Library for vehicle-specific tips. Contact customer support for troubleshooting help.
Note: Most issues stem from improper seal application or misalignment, not product defects.
Real-World Performance & User Feedback
Based on verified owner experiences, installation takes 30 to 60 minutes for first-timers and up to 90 minutes. The spring-assist opening earns high praise for convenience. Weather protection is excellent in rain and snow when seals are correctly applied.
The latch system deters casual theft but is not tamper-proof. The low-profile design enhances truck appearance. Users report slight fuel economy gains due to improved aerodynamics.
Key Takeaways for Installing Your TruXedo Tonneau Cover
Installing a TruXedo tonneau cover is a straightforward DIY project that most truck owners can complete in under an hour with basic tools. The key to success lies in proper surface preparation before applying seals, using a 1/8-inch shim for precise rail alignment, and torquing all clamps to exactly 7 ft-lb to prevent both leaks and operational issues.
After installation, take time to adjust spring tension for smooth one-handed operation and test the latch system to ensure full engagement. Regular cleaning with mild soap and annual seal inspection will keep your cover performing like new for years. Register your warranty online to activate full manufacturer support.
Frequently Asked Questions About Installing a TruXedo Tonneau Cover
How long does it take to install a TruXedo tonneau cover?
Most truck owners complete the installation in 30 to 60 minutes. First-time installers may need up to 90 minutes. Having all tools ready and working in a clean area speeds up the process significantly.
Do I need special tools to install a TruXedo tonneau cover?
You need basic tools including a ½-inch socket wrench or ratchet, rubbing alcohol, a clean rag, and scissors. A torque wrench is optional but recommended for achieving the exact 7 ft-lb specification. A 1/8-inch thick plastic shim helps with alignment.
Can I install a TruXedo cover on a truck with a drop-in bed liner?
You should not install the bulkhead seal if your truck has a drop-in plastic bed liner that wraps over the front bulkhead. The seal is only for trucks with spray-in liners or no liner. Skip the bulkhead seal step entirely for drop-in liners.
Why is my TruXedo cover leaking water after installation?
Water leaks typically stem from poor bulkhead seal adhesion, misaligned tail rail seals, or gaps caused by incorrect rail positioning. Re-clean surfaces and reapply seals. Verify the 1/8-inch gap is consistent on both sides. Retighten clamps to proper torque.
How do I adjust the tension on my TruXedo TruXport cover?
Release both latches, push in the lever, and rotate the thumb nut to adjust spring tension. Turn clockwise to increase tension or counterclockwise to reduce it. The cover should sound drum-like when tapped and roll smoothly in both directions.


