
If you’ve just bought a tri-fold tonneau cover and are wondering how to install tri-fold tonneau cover securely and efficiently, you’re in the right place. Whether you own a Ford F-150, Ram 1500, Chevrolet Silverado, or compact Ford Maverick, installing a tri-fold tonneau cover is a DIY-friendly upgrade that boosts cargo security, improves fuel economy, and enhances your truck’s sleek profile. Most installations take under an hour, require no drilling, and can be completed with basic tools or even by hand for soft models. This guide walks you through every step, from prep to final testing, ensuring a watertight, rattle-free fit that’s built to last.
Prepare Your Truck and Tools for Installation
Before lifting the cover into place, proper preparation prevents frustration and ensures a smooth installation. Skipping cleaning or compatibility checks is the top cause of leaks, misalignment, and clamp failure.
Verify Truck Compatibility
Before purchasing your cover, confirm your truck make, model, year, and bed length (5.5-ft or 6.5-ft). Check if you have a drop-in bedliner, spray-in liner, or bed cap, as these may affect clamp access. Hard and soft tri-fold covers are designed to fit specific models, so Ford Maverick owners should use OEM Ford Accessories from FordAccessories.com for guaranteed fit.
Gather Required Tools
Different cover types require different tools for installation:
For hard tri-fold covers, you will need:
– Rubbing alcohol and microfiber towel
– Socket set and screwdriver
– Power wrench (optional)
– Utility knife or razor blade
– Tape measure
For soft tri-fold covers, you will need:
– Glass cleaner and microfiber towel
– Utility knife
– Tape measure (optional)
No drilling is required for either model, as all use clamp-on systems.
Lay Out All Components
Unbox and identify all parts before starting. A typical hard tri-fold kit includes the pre-assembled cover, six bed clamps (three per side), bolts, wing nuts, rubber gaskets, bulkhead seal, weather stripping, drain tubes, bump stops, tie-down clips, and an instruction manual. Inspect each component for damage and ensure foam blocks are removed from rear mounting holes on hard covers.
Install the Front Bulkhead Seal
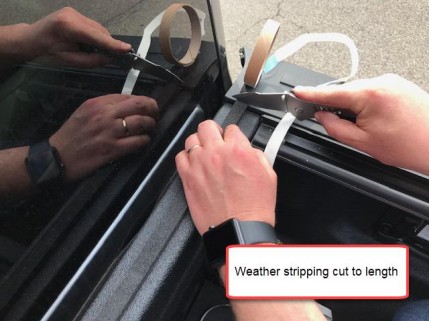
The bulkhead seal creates a watertight barrier between the truck cab and the cover, which is critical for preventing leaks. This step applies to both hard and soft tri-fold covers.
Clean the Front Bed Edge
Use rubbing alcohol or glass cleaner with a microfiber towel to wipe the front edge of the bed where the cover meets the cab. Remove all dirt, wax, or residue to ensure strong adhesion.
Cut and Apply the Seal
Unroll the bulkhead seal and measure across the bed width. Cut to fit using a utility knife or razor blade. Peel off the adhesive backing and press firmly into place, ensuring no gaps or bubbles. Run your finger along the entire length to ensure continuous contact.
Pro Tip: Install in temperatures above 50°F (10°C) for best adhesion.
Attach Weather Stripping (Hard Covers Only)
Hard tri-fold covers include perimeter weather stripping to seal against the bed rails and prevent water intrusion. This step does not apply to soft covers.
Clean the Bed Rail Edge
Wipe the top edge of both bed rails with rubbing alcohol. Focus on areas where the rubber seal will contact the rail surface.
Press in the Stripping
Align the weather stripping with the plastic molding on the rail and press down firmly along its entire length. Trim excess at the front and rear using a razor blade for a flush finish. This step ensures a full seal and minimizes wind noise.
Mount Side Rails (Hard Covers Only)
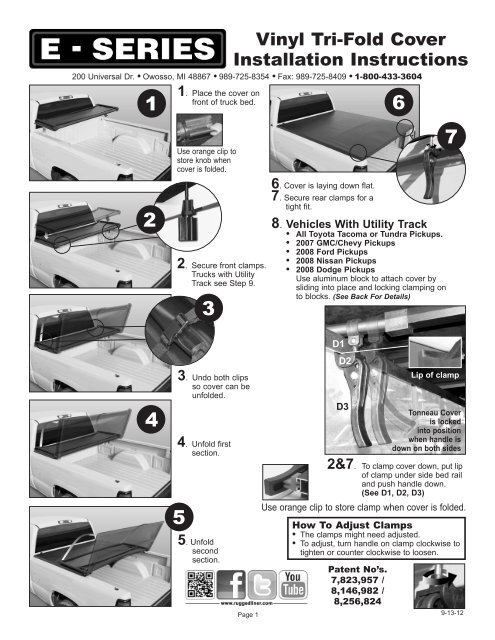
Hard tri-fold covers use side rails that the cover locks into, and proper alignment is essential for smooth operation.
Identify Left and Right Rails
Rails are labeled left and right. The front bracket faces inward toward the cab when properly oriented.
Position and Clamp the Rails
Loosen the clamp bolts and slide each rail onto the bed cap. Align the notch on the rail with the groove on the bed cap. Place three clamps per side at the front, middle, and rear positions. Start with the center clamp to center the rail, then secure front and rear clamps.
Tighten Gradually
Once aligned, tighten all clamps evenly. Do not over-tighten, as this can deform the rail or damage the bed cap. Rails should sit flush with the bed cap and parallel to the truck’s sides.
Prepare and Position the Cover in the Bed
Now that the rails or bed edges are ready, it’s time to set up the cover for installation.
Prepare the Cover
For hard covers, place the cover in the bed with the right side down (as viewed from the rear). Install tie-down clips using spacer bolts and washers, tightening lightly for now. Insert mounting bolts with rubber gaskets to ensure a watertight seal. For soft covers, fully extend the aluminum frame and ensure clamps are functional and buckles are not twisted. Soft tri-folds come pre-assembled, so no assembly is needed.
Lift and Align the Cover
With the tailgate open, lift the cover into the bed. For hard covers, align the mounting holes with the side rails. For soft covers, position the front edge near the cab. Leave a 3/8″ to 1/2″ gap between the rear of the cover and the truck cab to prevent rubbing. Use a tape measure to confirm equal space on both sides for symmetrical reveal.
Too tight risks rubbing against the cab. Too loose compromises the weather seal and aesthetics.
Install Bump Stops (Hard Covers Only)
Bump stops prevent noise and wear when folding and unfolding the cover. This step applies only to hard tri-fold models.
Clean and Apply Bump Stops
Wipe the top edge of the first fold segment with rubbing alcohol. Apply adhesive (about thumb-width) to the sides of each bump stop. Affix three bump stops, one on each side and one centered. Press firmly and allow 10 to 15 minutes to set before moving the cover. These reduce vibration and protect the vinyl hinge from abrasion.
Mount Cover to Rails and Secure Clamps
This section covers securing the cover to the side rails (hard covers) and installing all clamps (both hard and soft models).
Mount to Rails (Hard Covers)
Open the tailgate and lift the cover slightly. Insert mounting bolts from the inside of the cover through the rail holes. Use this order: rubber washer (seals the hole), metal washer (distributes pressure), and locking nut (tighten securely). Start with center bolts, then front and rear. Re-check alignment and gap after tightening.
Secure Hard Cover Clamps
Slide track clamps behind the cab and insert triangle-shaped screws. The plastic molding will pull back slightly, which is normal. Tighten the screw, then use the wing nut as a jam nut to prevent loosening.
Secure Soft Cover Clamps
Start with front panel clamps, hooking under the bed rail. Tighten by hand, as no tools are needed. Move to middle and rear clamps, tightening sequentially. After all are secured, re-tighten each clamp 1 to 2 turns for uniform tension.
Critical: Clamps must grip bare metal, not plastic caps or bedliners. Drop-in liners require cutting access holes in the flange to expose metal. Spray-in liners may require grinding or re-drilling.
Install Drain Tubes (Hard Covers Only)
Drain tubes channel water away from the rails to prevent pooling and corrosion. This step applies only to hard tri-fold covers.
Attach and Route the Tubes
Connect the plastic end of the rubber drain tube to the front of the rail. Route the tube along the rail toward the front of the truck and exit through the factory-drilled hole near the cab. Ensure the drain extends to ground level. Never route into wheel wells, as this can cause water damage and rust.
Pro Tip: Use zip ties to secure the tube and prevent flapping.
Final Inspection and Testing
Before hitting the road, test every function to ensure proper installation.
Check Seal and Fit
Close the tailgate and inspect latch engagement. Ensure the rubber seal makes full contact around the perimeter. Confirm the cover does not touch the cab.
Test Folding Operation
Unlock cam latches (hard) or release buckles (soft). Fold the rear panel onto the middle, then forward toward the cab. For half-open positions, use tie-down clips to secure. For full-open positions, the cover should lock snugly against the cab. Push down to verify the cover does not wobble.
Security Check
With the tailgate locked, verify no external access to the bed. The cover cannot be lifted from the sides when locked.
Handle Special Fit Scenarios
Most installation issues arise from bed modifications. Here’s how to adapt:
| Scenario | Solution |
|---|---|
| Flush bed caps | Clamps attach directly with no modification needed |
| Non-flush bed caps | Cut a pocket in the middle panel so clamp grips metal rail |
| Drop-in bedliner | Cut access hole in mounting flange to reach bare metal |
| Spray-in liner | Grind or re-drill to expose clamping points |
| Aftermarket toolbox | Confirm clearance with side rails, as it may block clamp placement |
Golden Rule: Clamp to metal only. Plastic or liner leads to slippage and vibration damage.
Use and Maintain Your Cover
Proper use extends the cover’s life and maintains performance.
Operating the Cover
For partial bed access, unlock the rear section, fold rear onto middle, then forward toward the cab. Secure with buckles or clips. This allows use of the tail end of the bed while protecting front cargo. For full bed access, hard covers fold completely or can be removed if needed. Soft covers unclamp and lift out, though many users leave rear clamps attached for quick reinstallation.
Maintenance Schedule
Clean the cover monthly using mild soap and water, avoiding harsh chemicals. Inspect seals every 3 to 6 months and replace if cracked or detached. Lubricate cam locks annually using silicone spray only. Check clamp tightness every few months, as road vibration loosens them. Clear drain tubes seasonally to prevent clogs and water pooling. Re-tighten mounting bolts 1 to 2 times per year to prevent loosening from vibration.
Frequently Asked Questions About Tri-Fold Tonneau Cover Installation
How long does it take to install a tri-fold tonneau cover?
Hard tri-fold covers typically take 30 to 120 minutes, with most DIY installers completing the job in 45 to 60 minutes. Soft tri-fold covers install faster, usually in 10 to 30 minutes, as they require no tools and minimal assembly.
Do I need to drill holes to install a tri-fold tonneau cover?
No, tri-fold tonneau covers use clamp-on systems that require no drilling or permanent modifications. All mounting points attach to the bed rails or existing bed cap using clamps and bolts.
Can I install a tri-fold cover with a drop-in bedliner?
Yes, but you must cut access holes in the mounting flange to allow clamps to reach the bare metal bed rail beneath the liner. This is a simple modification that takes about 15 minutes.
How do I prevent my tonneau cover from leaking?
Install the front bulkhead seal properly by cleaning the surface with rubbing alcohol before applying. Ensure weather stripping is continuous with no gaps. For hard covers, verify drain tubes are clear and route water to ground level, not into wheel wells.
Why is my cover rattling or moving after installation?
Rattling typically occurs when clamps are not tightened enough or are gripping plastic instead of bare metal. Check that all clamps secure to the metal bed rail. Re-tighten clamps after the first few drives, as vibration can loosen them over time.
Can I use my truck bed for cargo with the cover installed?
Yes, the tri-fold design allows partial bed access. Fold the rear section forward to access the tail end of the bed while keeping the front cargo protected. For full bed access, fold the entire cover forward or remove it completely.
Key Takeaways for Installing Your Tri-Fold Tonneau Cover
Installing a tri-fold tonneau cover is one of the smartest upgrades for any truck owner. With no drilling, minimal tools, and under an hour of work, you gain security, fuel savings (users report 1 to 2 mpg improvement), and a sleek look that lasts for years. Whether you choose a hard tri-fold for durability or a soft model for quick access, following this guide ensures a professional-quality installation every time.
Double-check your bed length before ordering, as 5.5-ft versus 6.5-ft beds require different covers. Clean all mounting surfaces with alcohol before applying seals, and ensure every clamp grips bare metal rather than plastic caps or bedliners. Route drain tubes to ground level, install bump stops on hard covers to prevent hinge wear, and re-check clamp tightness after your first few drives. Using a locking tailgate alongside your cover provides excellent security, and periodic maintenance keeps the seal tight and operation smooth for a decade or more.


