
Installing a gooseneck ball in your truck bed unlocks serious towing capability for heavy loads like livestock trailers, flatbeds, and large RVs. This setup delivers a stable, secure connection that outperforms standard bumper hitches for high-weight applications. While the job involves several steps and some heavy lifting, most DIYers with basic tools can complete it in just a few hours.
This guide covers every phase of the install, from clearing the spare tire to torqueing the final bolt. You’ll learn how to position the ball correctly, mount crossarm brackets, and finish with safety chain anchors. Follow along carefully, and you’ll have a dependable gooseneck hitch ready for the road.
Prepare the Truck Bed and Remove Obstructions
Start by clearing the spare tire mounted beneath the bed. This creates the workspace needed to access the frame and underside of the truck bed.
Trim Heat Shields and Wheel Well Liners
Some trucks feature heat shields, fender liners, or brake line covers that interfere with hitch components. Inspect the wheel wells and underbody carefully. Use tin snips or a utility knife to remove only what blocks bracket clearance. Never cut into brake lines, fuel lines, structural framing, or wiring.
Set aside any removed parts for reinstallation once the hitch is mounted. Preserving factory components helps prevent corrosion down the road.
Measure and Drill the Gooseneck Ball Hole
Accurate placement ensures proper trailer alignment and balanced weight distribution. The ball must sit above or slightly ahead of the rear axle and centered between the wheel wells.
Confirm Centering and Drill the Opening
Measure from the inside of each wheel well to find the exact center point. Mark it with a center punch, then consult your hitch manual for model-specific measurements. Drill a pilot hole first to verify alignment from both sides of the bed.
Once confirmed, use a hole saw to cut the full opening, typically 3-3/8 inches or whatever the manual specifies. Deburr all sharp edges and coat the exposed metal with touch-up paint to block rust.
Insert the Rear and Front Crossarm Brackets

Crossarm brackets anchor the hitch to the frame and support the center section. Start with the rear bracket through the driver-side wheel well.
Feed the Rear Crossarm Into Position
Slide the rear crossarm through the wheel well opening and guide it under the bed toward the center. Once centered on the frame, rotate it until the bolt holes line up. Some models require a 90-degree turn to lock into place.
Check that the bracket rests flat against the frame. Avoid pinching brake lines or ABS sensors during insertion. Use a flashlight to verify alignment from below.
Install the Front Crossarm
Insert the front crossarm through the same access point or the passenger side, depending on the model. Align it with the frame per the instruction manual. This bracket typically bolts directly into position without rotation.
Both crossarms must sit level and centered. Misalignment creates stress on hardware and reduces hitch performance.
Mount the Gooseneck Center Section
The center section holds the gooseneck ball mount and connects to both crossarms. Since it can weigh 50 pounds or more, grab a helper for this step.
Lift and Secure the Center Section
With assistance, raise the center section beneath the truck bed. Align it with the ball hole and crossarm brackets. Some models feature guide pins or alignment slots that simplify positioning.
Once seated, insert bolts through the crossarms into the center section. Hand-tighten for now, since final torque comes later. Single-person installation is possible with lift tools or pivoting jigs designed for certain hitch models.
Bolt On the Side Plate Brackets
Side plates reinforce the connection between the crossarms and the frame, adding critical stability for heavy towing.
Fishwire Hardware and Square the Hitch
Attach side plates to the crossarm ends using the included bolts and washers. These mount inside the wheel wells and must sit flush with the frame.
On certain trucks, you may need to fishwire bolts through the frame using a wire or magnetic tool. Work slowly to avoid dropping hardware into the frame cavity. Install plates on both driver and passenger sides.
Before final tightening, confirm the hitch is square with the truck’s centerline. Measure from the ball to each wheel well. Matching measurements indicate proper centering.
Torque All Hardware to Manufacturer Specs

Correct torque values prevent loosening under heavy loads and ensure long-term safety.
Follow the Torque Sequence
Use a torque wrench to tighten every nut and bolt to the values listed in your hitch manual. This includes crossarm-to-frame bolts, center section fasteners, and side plate hardware. Typical ranges fall between 75 and 125 ft-lbs, though your model may differ.
Tighten in a crisscross pattern to distribute pressure evenly. Recheck torque after the first 500 miles of towing. Over-tightening strips threads, while under-tightening risks failure.
Install the Safety Chain Anchors
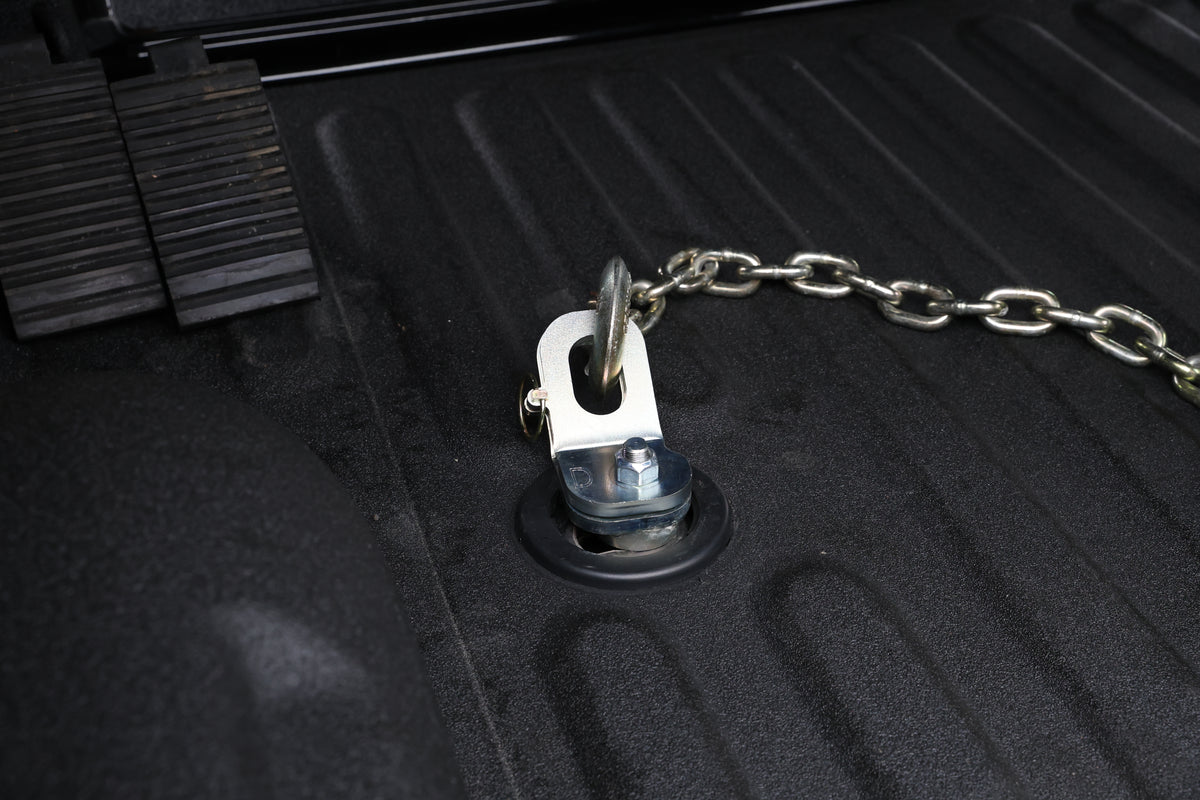
Safety chains serve as a vital backup if the trailer ever detaches from the ball. They must be anchored directly to the truck bed.
Drill Through the Bed Floor
Use the installed center section as a template to mark drill points. Drill upward through the bed from underneath to ensure precise placement. Holes are usually 1/2 inch or whatever your manual specifies.
Deburr the edges and apply touch-up paint to exposed metal. Drop the anchor loops through the holes and secure them with nuts and washers underneath. Confirm they sit tight without wobbling, and position them so chains attach to the trailer without twisting.
Mount the Operating Handle and Locking Pin
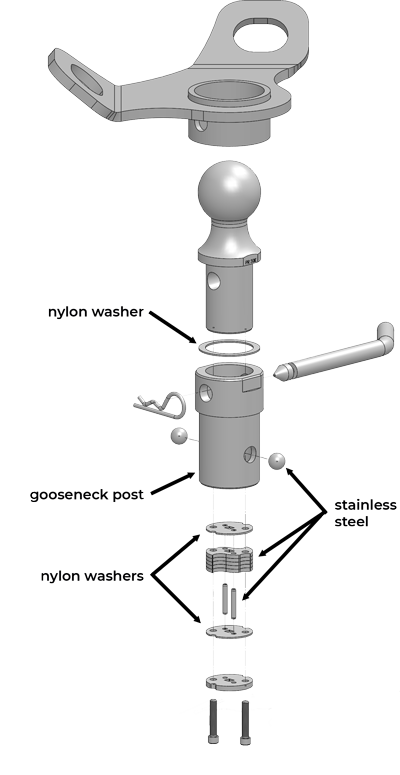
The operating handle controls the gooseneck ball, especially on folding or removable designs. Proper installation ensures smooth operation.
Install the Locking Mechanism First
Attach the locking pin assembly to the side of the ball hole. This secures the ball in the raised or locked position. Apply threadlocker to bolts if recommended by the manufacturer.
Slide the Handle Through the Wheel Well
Thread the handle through the wheel well access point, into the center section, and connect it to the locking pin. Secure with the provided cotter pins or fasteners.
Test the handle to confirm smooth movement and firm locking. If your hitch includes a trim ring, snap or bolt it around the ball hole for a clean, finished look.
Reinstall the Spare Tire and Factory Trim
With the hitch fully installed, restore your truck’s underbody to factory condition.
Replace the Spare Tire
Reattach the spare tire beneath the bed using the original mounting hardware. Confirm it’s tight and clear of the hitch or any moving parts.
Reattach Heat Shields and Liners
Reinstall any heat shields, fender liners, or protective covers removed earlier. Avoid trimming more than necessary, since preserving factory components prevents corrosion and protects resale value.
Do a final sweep underneath the truck to confirm no tools or hardware remain.
Frequently Asked Questions About Installing a Gooseneck Ball
Do I need to remove the spare tire to install a gooseneck ball?
Yes. Removing the spare tire gives you the access needed to reach the truck bed floor, frame, and wheel wells. Most installations cannot be completed without this step.
Where should the gooseneck ball be positioned in the truck bed?
The ball should sit above or slightly forward of the rear axle and centered between the wheel wells. Always confirm placement with your hitch manufacturer’s instructions for exact distances.
How heavy is a gooseneck center section?
Gooseneck center sections typically weigh around 50 pounds or more. Lifting it into place usually requires a second person or a specialized installation tool.
What tools do I need to install a gooseneck hitch?
Basic hand tools, a drill with a hole saw, a torque wrench, and safety gear are required. You may also need tin snips, a center punch, and touch-up paint for exposed metal.
How tight should I torque gooseneck hitch hardware?
Torque values vary by model, but most fall between 75 and 125 ft-lbs. Always follow the exact specs in your hitch manufacturer’s manual to avoid under- or over-tightening.
Key Takeaways for a Safe Gooseneck Ball Installation
A successful gooseneck ball installation comes down to three essentials: precise measurement, correct hardware torque, and careful preservation of factory components. Double-checking your centering before drilling prevents costly mistakes, and torquing every bolt to spec keeps the hitch secure under heavy loads. Trimming only what blocks clearance protects your truck from unnecessary corrosion.
After installation, inspect the hitch regularly, especially before long trips, and clear debris from moving parts. Recheck torque after the first 500 miles, then periodically thereafter. With proper installation and routine care, your gooseneck hitch will deliver reliable towing performance for years to come.


